> ## Documentation Index
> Fetch the complete documentation index at: https://moengage-partner-guide.mintlify.site/llms.txt
> Use this file to discover all available pages before exploring further.
# Databricks
[Databricks](https://www.databricks.com/resources/ebook/maximize-your-organizations-potential-data-and-ai?scid=7018Y000001Fi1AQAS\&utm_medium=paid+search\&utm_source=google\&utm_campaign=15418435374\&utm_adgroup=130717555576\&utm_content=ebook\&utm_offer=maximize-your-organizations-potential-data-and-ai\&utm_ad=703594935116\&utm_term=databricks\&gad_source=1\&gclid=CjwKCAjwvr--BhB5EiwAd5YbXpGh4ugWZyyOwJrqbfr-c5cZhP9HVrGMKQmBuZRlVcC_BRLco-zKVxoCmZkQAvD_BwE) is a platform that allows organizations to store, analyze, and process large volumes of structured and semi-structured data in a highly scalable and efficient manner. With its unique architecture, Databricks allows organizations to consolidate their data, perform quick analytics, and gain valuable data-driven insights accessible to all users.
# MoEngage × Databricks
The MoEngage × Databricks integration allows you to set up a direct connection between your Databricks instance and MoEngage app to sync data regularly. You can define a schedule to run the sync periodically; periodic syncs can be frequent or with a time interval, such as once every month. During synchronization, MoEngage will directly connect to your data warehouse instance, retrieve all new data from the specified table or the table you have access to, and update the corresponding data on your MoEngage dashboard.
## Use Cases
Databricks integration with MoEngage helps you with the following use cases:
* Sync real-time audiences from Databricks
* Import users and events from Databricks
* Export campaign interaction events to Databricks
## Advantages
The integration with MoEngage helps you with the following advantages:
### Reduce Integration Time
* No more searching for the right ETL (Extract, Transform, and Load) tool, as MoEngage directly integrates with Databricks.
* Long and complicated ETL pipelines are now replaced with a one-time integration setup that gives MoEngage direct access to your data.
* This decreases the dependency on tech teams significantly.
### Faster Data Processing
* The power of the Databricks infrastructure enables us to store, process, and query massive amounts of data in near real-time.
* Any changes in the original schema are propagated immediately without having to change any configuration on MoEngage’s end, which is a significant advantage over the traditional ETL pipelines.
* Since there is no need for ETL tools and external cloud providers, the cost of import is significantly lower than traditional data pipelines.
# Integration
**Prerequisites**
Ensure you have a Databricks account with permission to create new users, schemas, or tables.
## Step 1: Grant Permissions to MoEngage
To run queries on data from Databricks or Import data into MoEngage, you must connect to your Databricks warehouse. Ensure you have administrative privileges on the Databricks platform and that your PAT does not expire. Steps to grant read access to MoEnagage:
* Add a service principal in Databricks
* Assign a service principal to Databricks workspace
* Provide data reader access to the service principal
* Provide compute permissions on SQL warehouses to service principal
* Create a personal access token (PAT)
* Fetch the HTTP path and Hostname
* Share details with MoEngage
**Add a Service Principal in Databricks**
Account admins can add service principals to the Databricks account using the account console. For more information, refer here.
Perform the following steps to add a service principal:
1. Log in to your account console in Databricks as an admin.
2. In the sidebar, click User Management.
3. On the Service principals tab, click Add Service principal.
4. Enter a name for the service principal.
5. Click Add.
**Assign a Service Principal to Databricks Workspace**
An admin can assign a service principal to a workspace using the account console. For more information, refer here.
Perform the following steps to assign permissions:
1. Log in to your account console in Databricks as an admin.
2. In the sidebar, click Workspaces.
3. Click your workspace name.
4. On the Permissions tab, click Add permissions.
5. Search for and select the service principal, and assign the permission level (Workspace User). You can assign the workspace admin role on the workspace admin settings page.
6. Click Save.
**Provide Data Reader Access to the Service Principal**
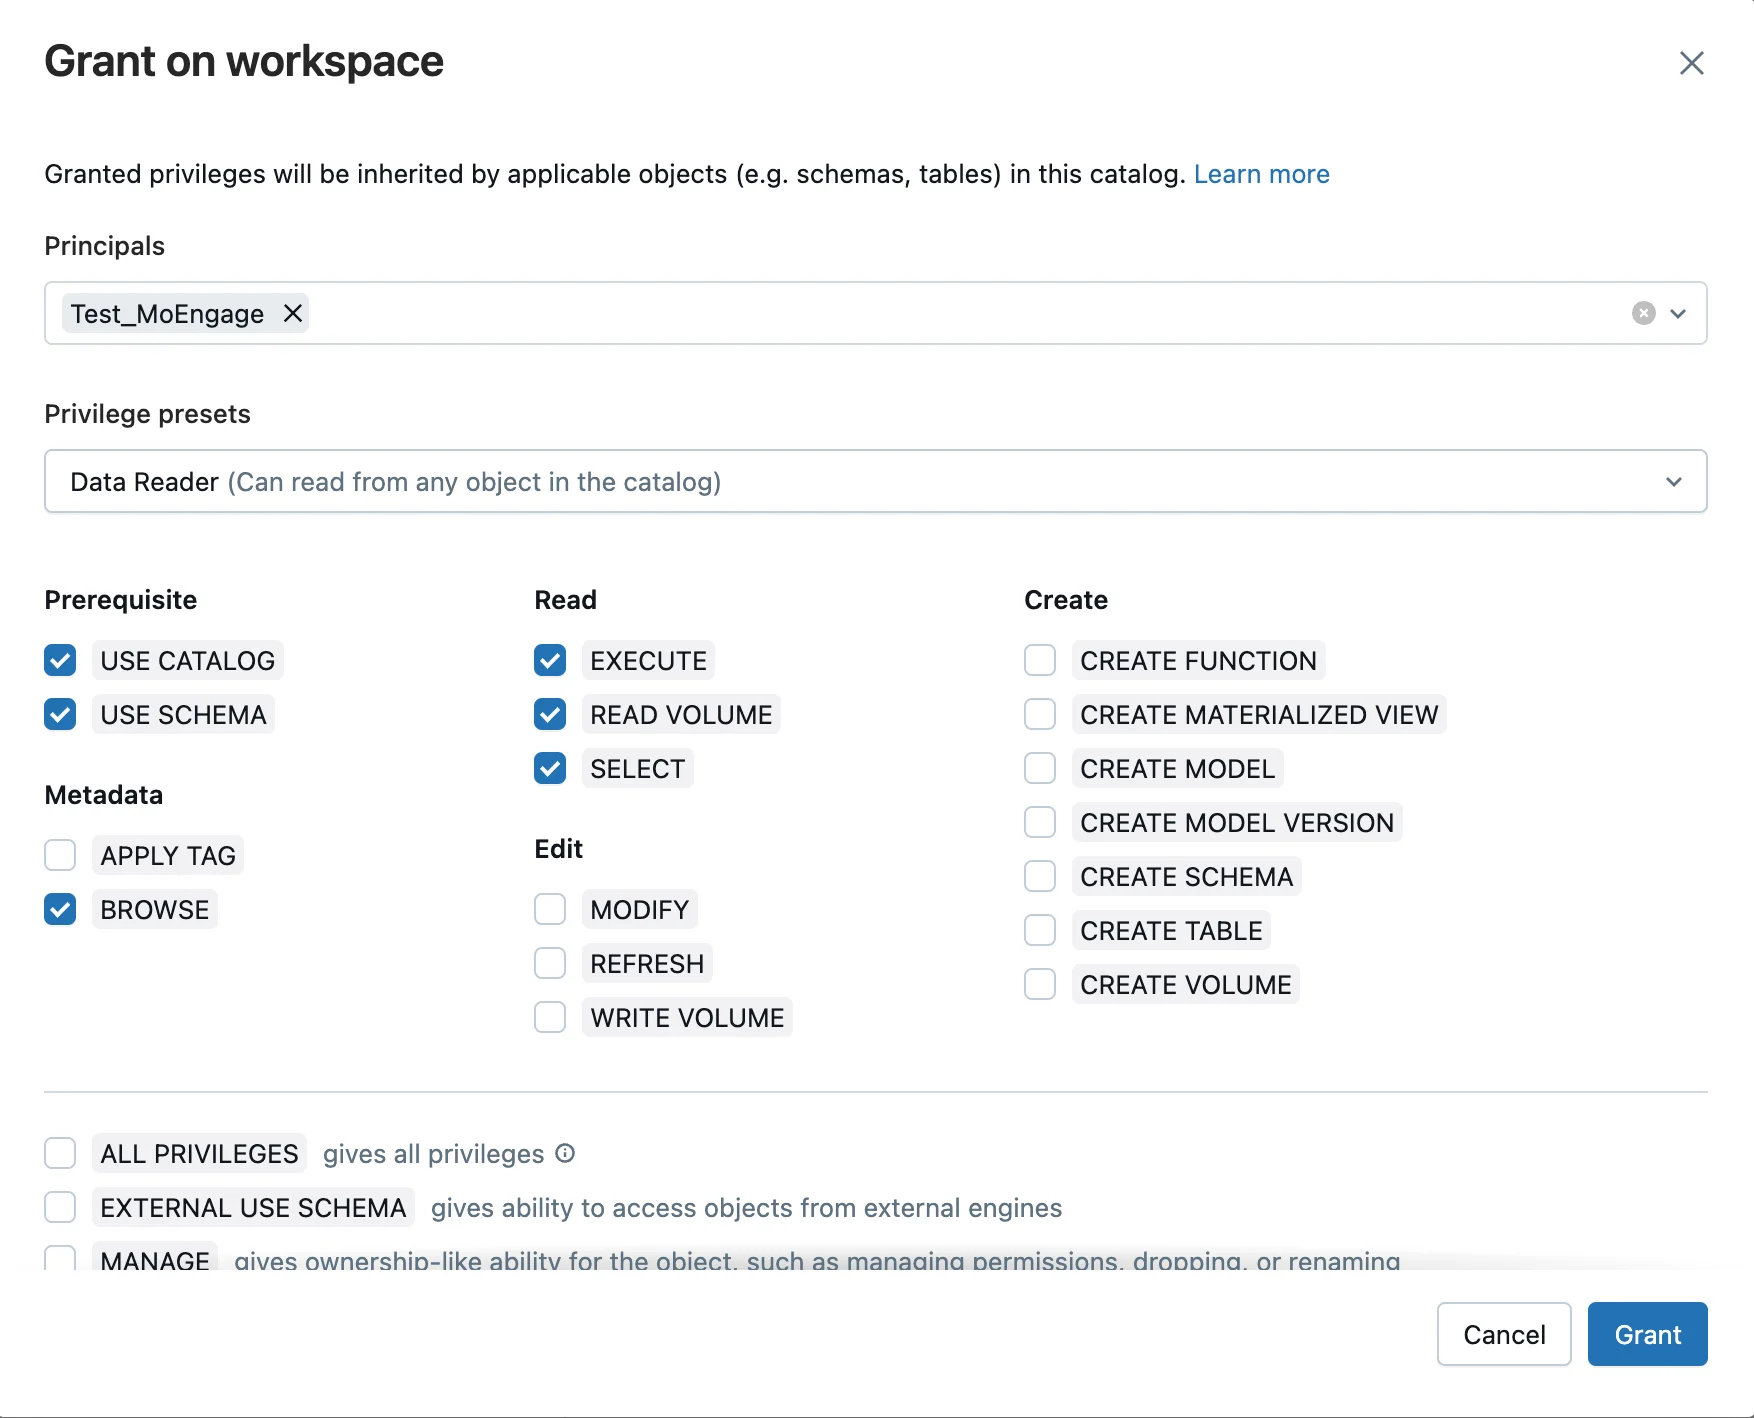
Provide data reader access, as shown below, to the entire workspace or individual schemas to the service principal, ensuring that the tables you want to query in MoEngage are available in the schema:
1. Go to your Databricks Dashboard Catalog.
2. Select your desired Catalog.
3. On the Permissions tab, click Add permissions.
4. Click on "Grant" and select the following permissions:
 **Provide Permissions to the Service Principal to Compute on SQL Warehouses**
Perform the following steps to provide compute permissions:
1. In the Databricks dashboard, Click Settings Compute SQL warehouses.
2. Select the warehouse that needs to be accessed by the service principal.
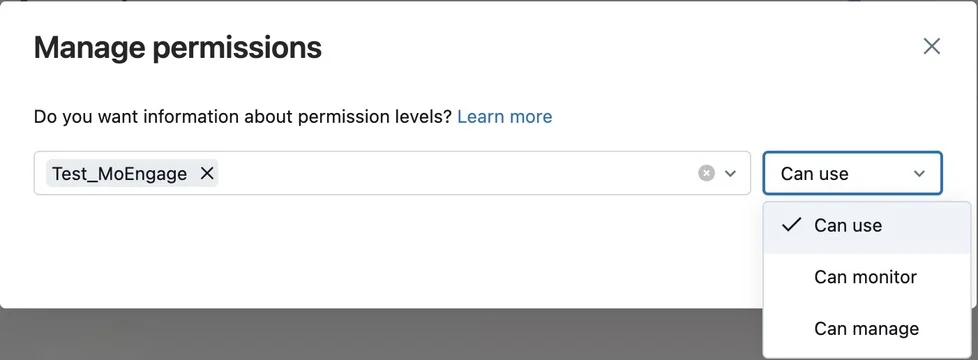
3. Click Permissions. In the list, select Can use for the service principal.
**Provide Permissions to the Service Principal to Compute on SQL Warehouses**
Perform the following steps to provide compute permissions:
1. In the Databricks dashboard, Click Settings Compute SQL warehouses.
2. Select the warehouse that needs to be accessed by the service principal.
3. Click Permissions. In the list, select Can use for the service principal.
 **Create a Personal Access Token (PAT)**
You can create a PAT for a service principal using Databricks CLI. For more information, refer [here](https://docs.databricks.com/aws/en/dev-tools/auth/pat#databricks-personal-access-tokens-for-service-principals).
To export data from MoEngage to Databricks, you must connect MoEngage to your Databricks warehouse. Ensure you have administrative privileges on the Databricks platform and that your PAT has no expiry. Steps to grant write access to MoEnagage:
* Add a service principal in Databricks
* Assign a service principal to Databricks workspace
* Provide Write Access to the Service Principal
* Provide compute permissions on SQL warehouses to service principal
* Create a personal access token (PAT)
* Fetch the HTTP path and Hostname
* Share details with MoEngage
**Add a Service Principal in Databricks**
Account admins can add service principals to the Databricks account using the account console. For more information, refer here.
Perform the following steps to add a service principal:
1. Log in to your account console in Databricks as an admin.
2. In the sidebar, click User Management.
3. On the Service principals tab, click Add Service principal.
4. Enter a name for the service principal.
5. Click Add.
**Assign a Service Principal to Databricks Workspace**
An admin can assign a service principal to a workspace using the account console. For more information, refer here.
Perform the following steps to assign permissions:
1. Log in to your account console in Databricks as an admin.
2. In the sidebar, click Workspaces.
3. Click your workspace name.
4. On the Permissions tab, click Add permissions.
5. Search for and select the service principal, and assign the permission level (Workspace User). You can assign the workspace admin role on the workspace admin settings page.
6. Click Save.
**Provide Write Access to the Service Principal**
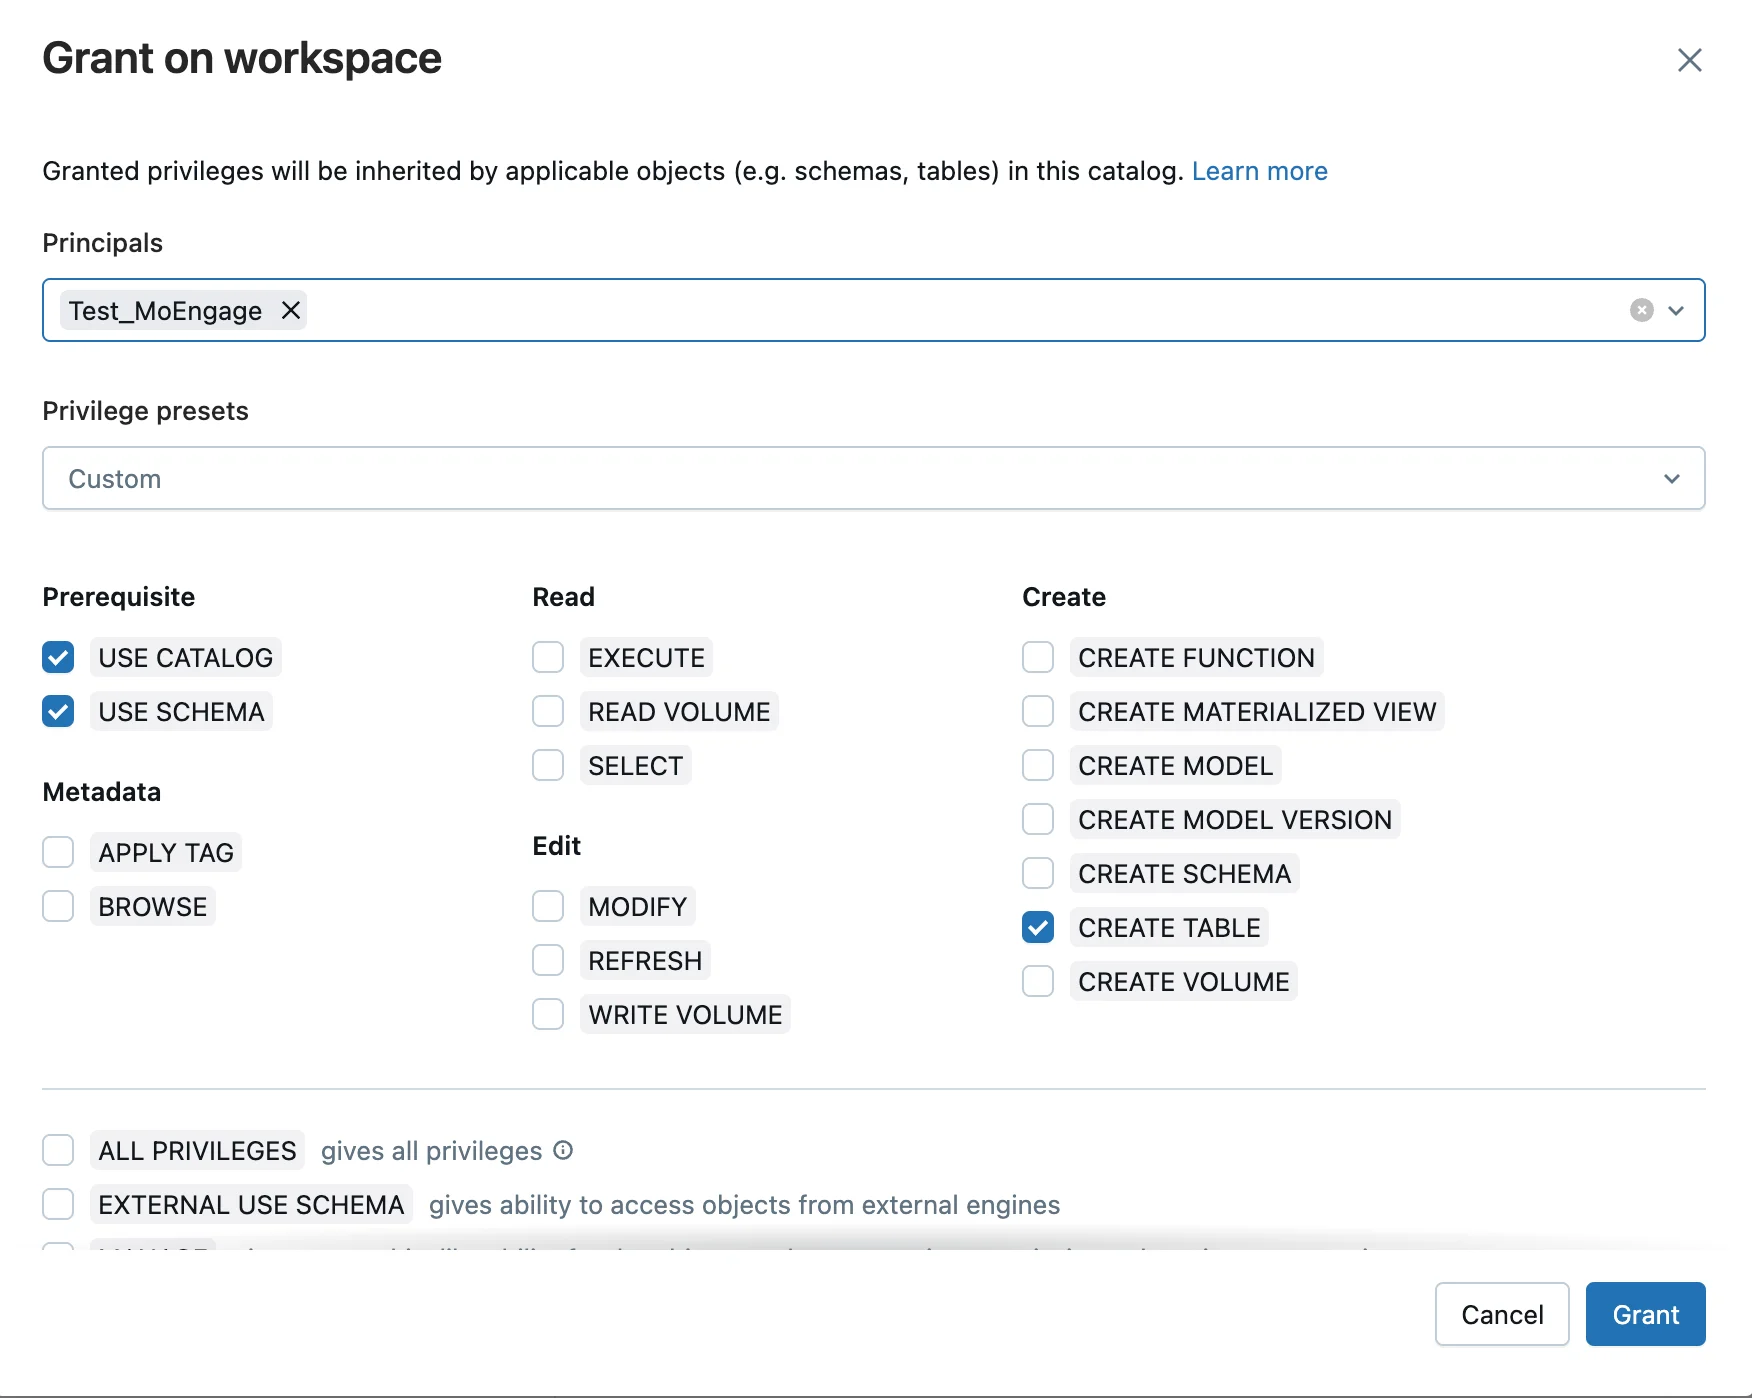
Provide Writer Access, as shown below, to the entire workspace or individual schemas to the service principal, ensuring that MoEngage has sufficient permissions to create tables and write data into them:
1. Go to your Databricks Dashboard Catalog.
2. Select your desired Catalog.
3. On the Permissions tab, click Add permissions.
4. Click on "Grant" and select the following permissions:
**Create a Personal Access Token (PAT)**
You can create a PAT for a service principal using Databricks CLI. For more information, refer [here](https://docs.databricks.com/aws/en/dev-tools/auth/pat#databricks-personal-access-tokens-for-service-principals).
To export data from MoEngage to Databricks, you must connect MoEngage to your Databricks warehouse. Ensure you have administrative privileges on the Databricks platform and that your PAT has no expiry. Steps to grant write access to MoEnagage:
* Add a service principal in Databricks
* Assign a service principal to Databricks workspace
* Provide Write Access to the Service Principal
* Provide compute permissions on SQL warehouses to service principal
* Create a personal access token (PAT)
* Fetch the HTTP path and Hostname
* Share details with MoEngage
**Add a Service Principal in Databricks**
Account admins can add service principals to the Databricks account using the account console. For more information, refer here.
Perform the following steps to add a service principal:
1. Log in to your account console in Databricks as an admin.
2. In the sidebar, click User Management.
3. On the Service principals tab, click Add Service principal.
4. Enter a name for the service principal.
5. Click Add.
**Assign a Service Principal to Databricks Workspace**
An admin can assign a service principal to a workspace using the account console. For more information, refer here.
Perform the following steps to assign permissions:
1. Log in to your account console in Databricks as an admin.
2. In the sidebar, click Workspaces.
3. Click your workspace name.
4. On the Permissions tab, click Add permissions.
5. Search for and select the service principal, and assign the permission level (Workspace User). You can assign the workspace admin role on the workspace admin settings page.
6. Click Save.
**Provide Write Access to the Service Principal**
Provide Writer Access, as shown below, to the entire workspace or individual schemas to the service principal, ensuring that MoEngage has sufficient permissions to create tables and write data into them:
1. Go to your Databricks Dashboard Catalog.
2. Select your desired Catalog.
3. On the Permissions tab, click Add permissions.
4. Click on "Grant" and select the following permissions:
 **Provide Permissions to the Service Principal to Compute on SQL Warehouses**
Perform the following steps to provide compute permissions:
1. In the Databricks dashboard, Click Settings Compute SQL warehouses.
2. Select the warehouse that needs to be accessed by the service principal.
3. Click Permissions. In the list, select Can use for the service principal.
**Create a Personal Access Token (PAT)**
You can create a PAT for a service principal using Databricks CLI. For more information, refer [here](https://docs.databricks.com/aws/en/dev-tools/auth/pat#databricks-personal-access-tokens-for-service-principals).
You can also create a user, assign appropriate access to the user, and allow MoEngage to access your warehouse from that user’s role. However, Databricks recommends the service principal approach. If you want to create a personal access token for a user, please follow the steps below. Alternatively, you can follow the steps mentioned here (From 6 through 12).
1. In your Databricks workspace, select your Databricks username in the title bar, and then select **Settings** from the list.
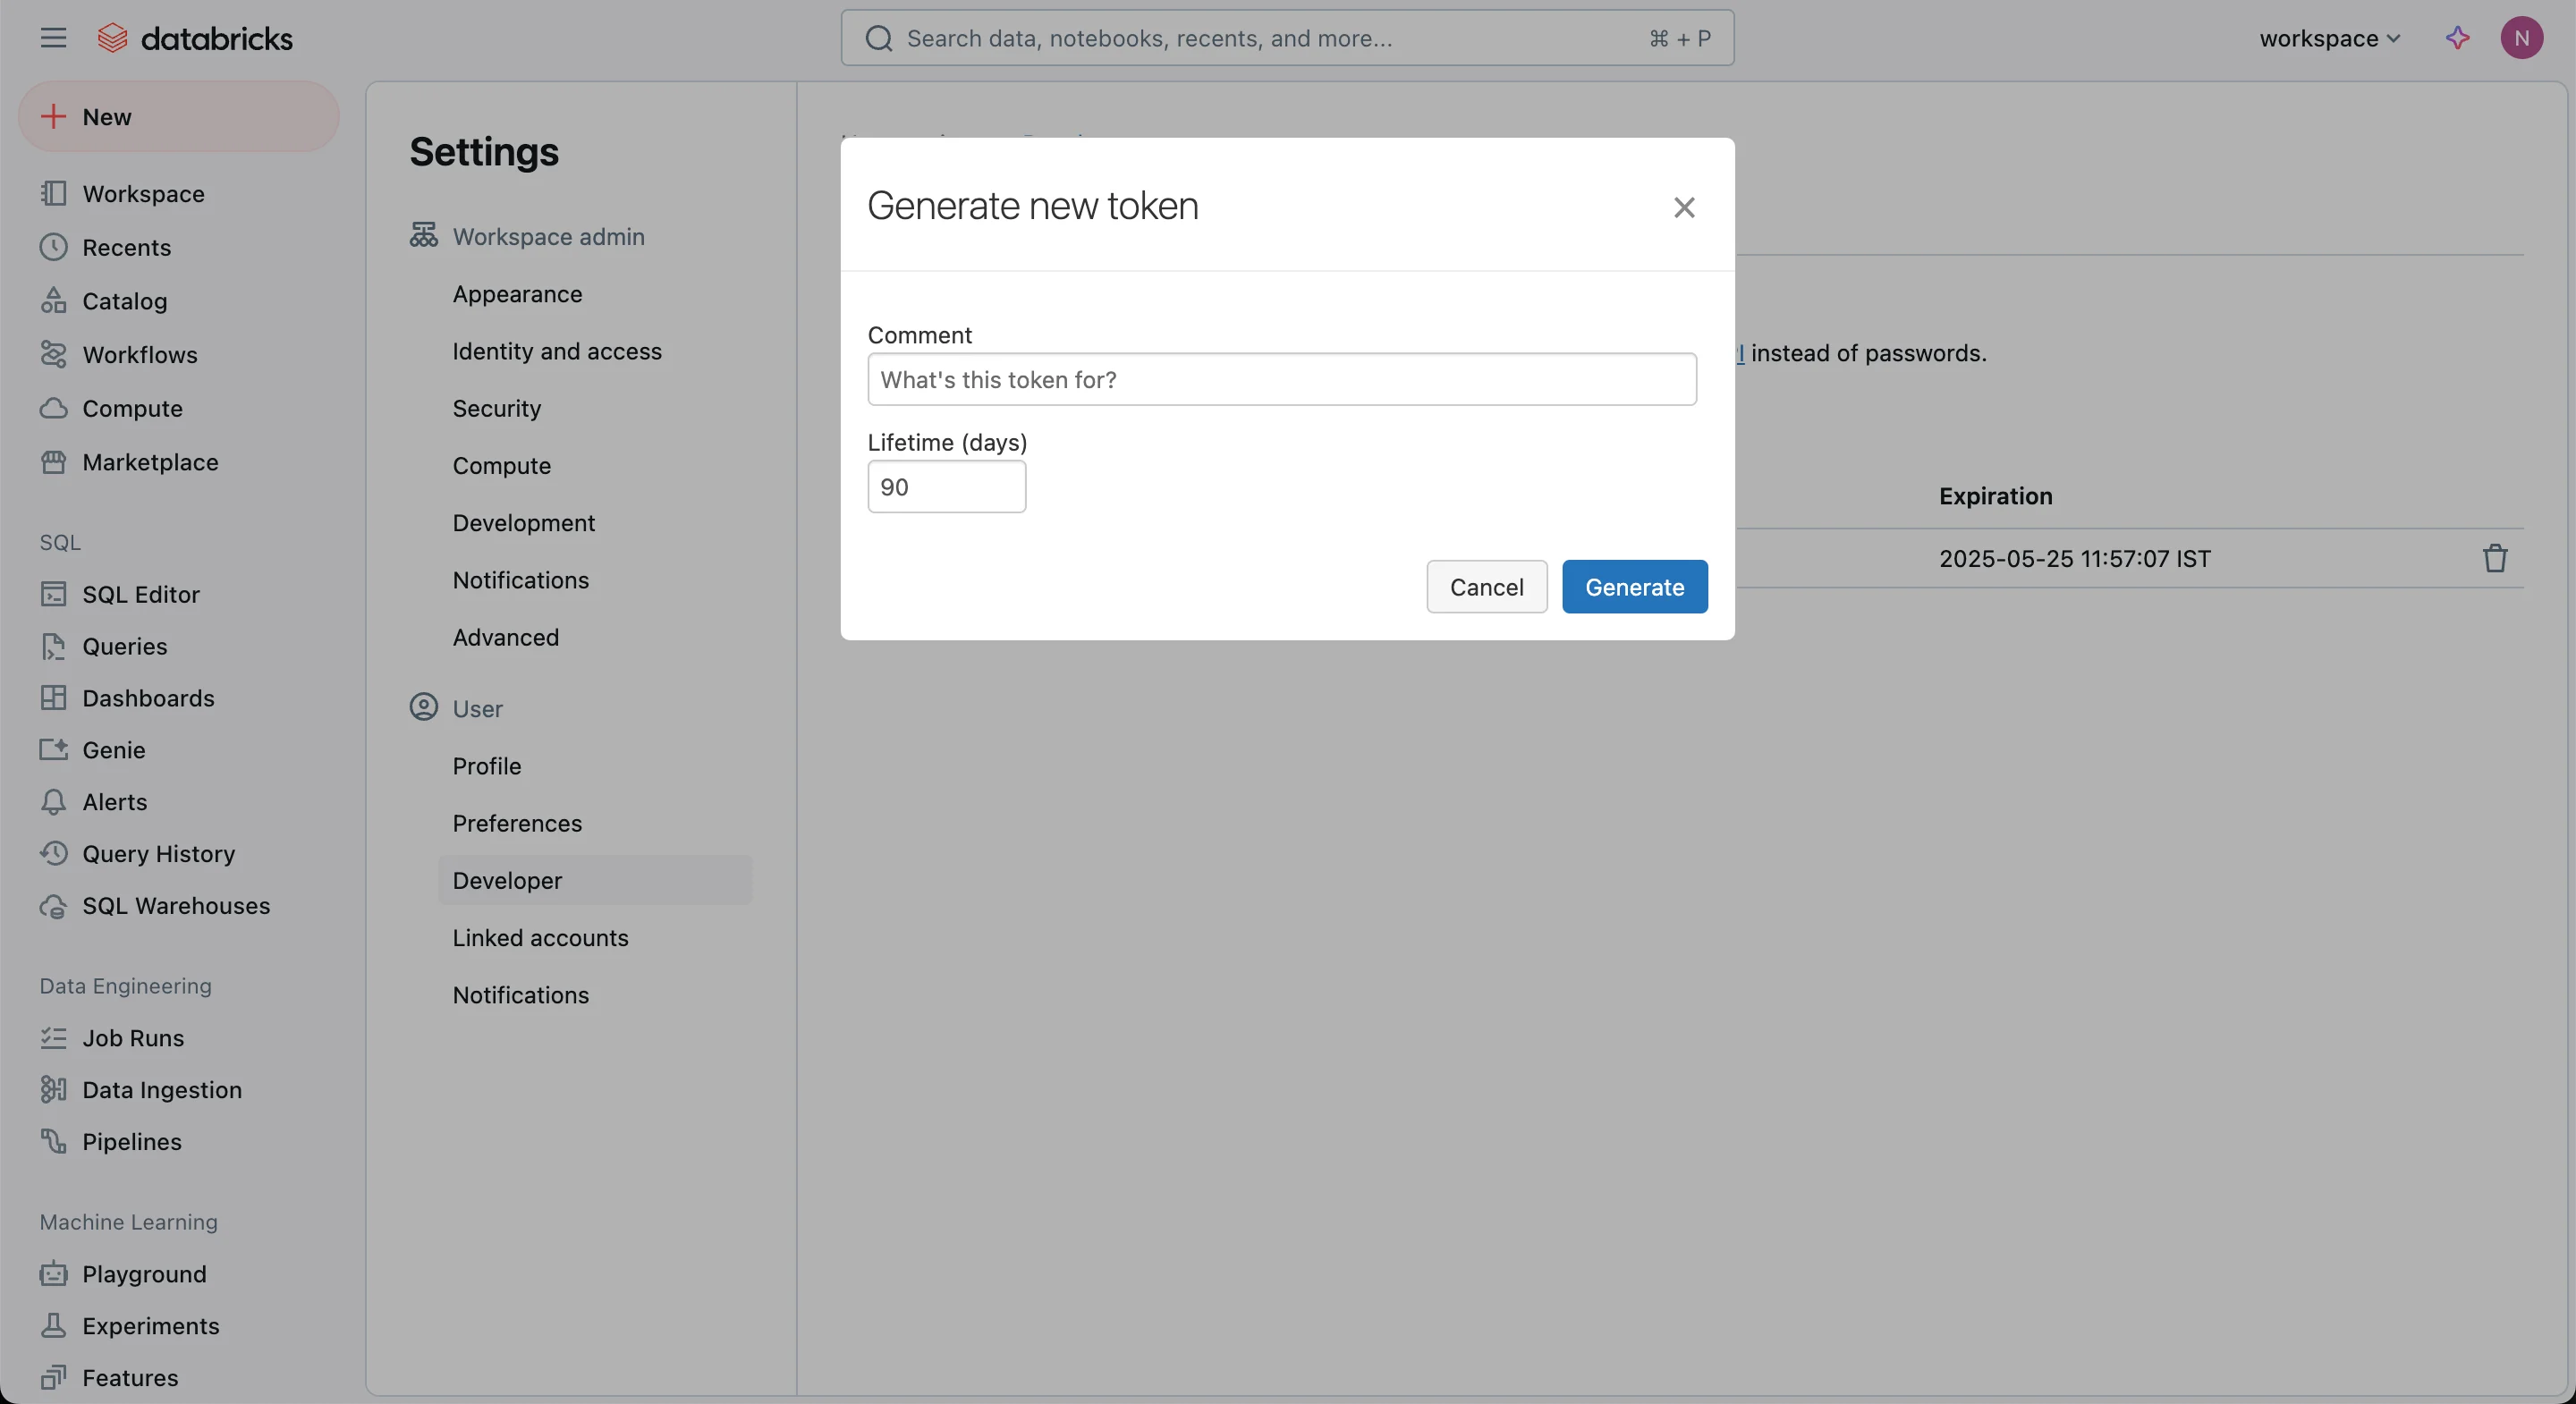
2. On the **Access Tokens** tab, select **Generate New Token.**
3. Enter a comment to identify this token, and change the token’s lifetime to no lifetime by leaving the Lifetime box empty.
4. Click **Generate** and copy the generated token.
5. Click **Done**.
**Provide Permissions to the Service Principal to Compute on SQL Warehouses**
Perform the following steps to provide compute permissions:
1. In the Databricks dashboard, Click Settings Compute SQL warehouses.
2. Select the warehouse that needs to be accessed by the service principal.
3. Click Permissions. In the list, select Can use for the service principal.
**Create a Personal Access Token (PAT)**
You can create a PAT for a service principal using Databricks CLI. For more information, refer [here](https://docs.databricks.com/aws/en/dev-tools/auth/pat#databricks-personal-access-tokens-for-service-principals).
You can also create a user, assign appropriate access to the user, and allow MoEngage to access your warehouse from that user’s role. However, Databricks recommends the service principal approach. If you want to create a personal access token for a user, please follow the steps below. Alternatively, you can follow the steps mentioned here (From 6 through 12).
1. In your Databricks workspace, select your Databricks username in the title bar, and then select **Settings** from the list.
2. On the **Access Tokens** tab, select **Generate New Token.**
3. Enter a comment to identify this token, and change the token’s lifetime to no lifetime by leaving the Lifetime box empty.
4. Click **Generate** and copy the generated token.
5. Click **Done**.
 ## Step 2: Obtain Databricks Credentials for App Marketplace Integration
To obtain Databricks credentials for the App marketplace, perform the following steps:
1. Login to your Databricks account.
2. On the left navigation menu, click the **SQL Warehouses** tab.
3. Click **Serverless Starter Warehouse**.
## Step 2: Obtain Databricks Credentials for App Marketplace Integration
To obtain Databricks credentials for the App marketplace, perform the following steps:
1. Login to your Databricks account.
2. On the left navigation menu, click the **SQL Warehouses** tab.
3. Click **Serverless Starter Warehouse**. 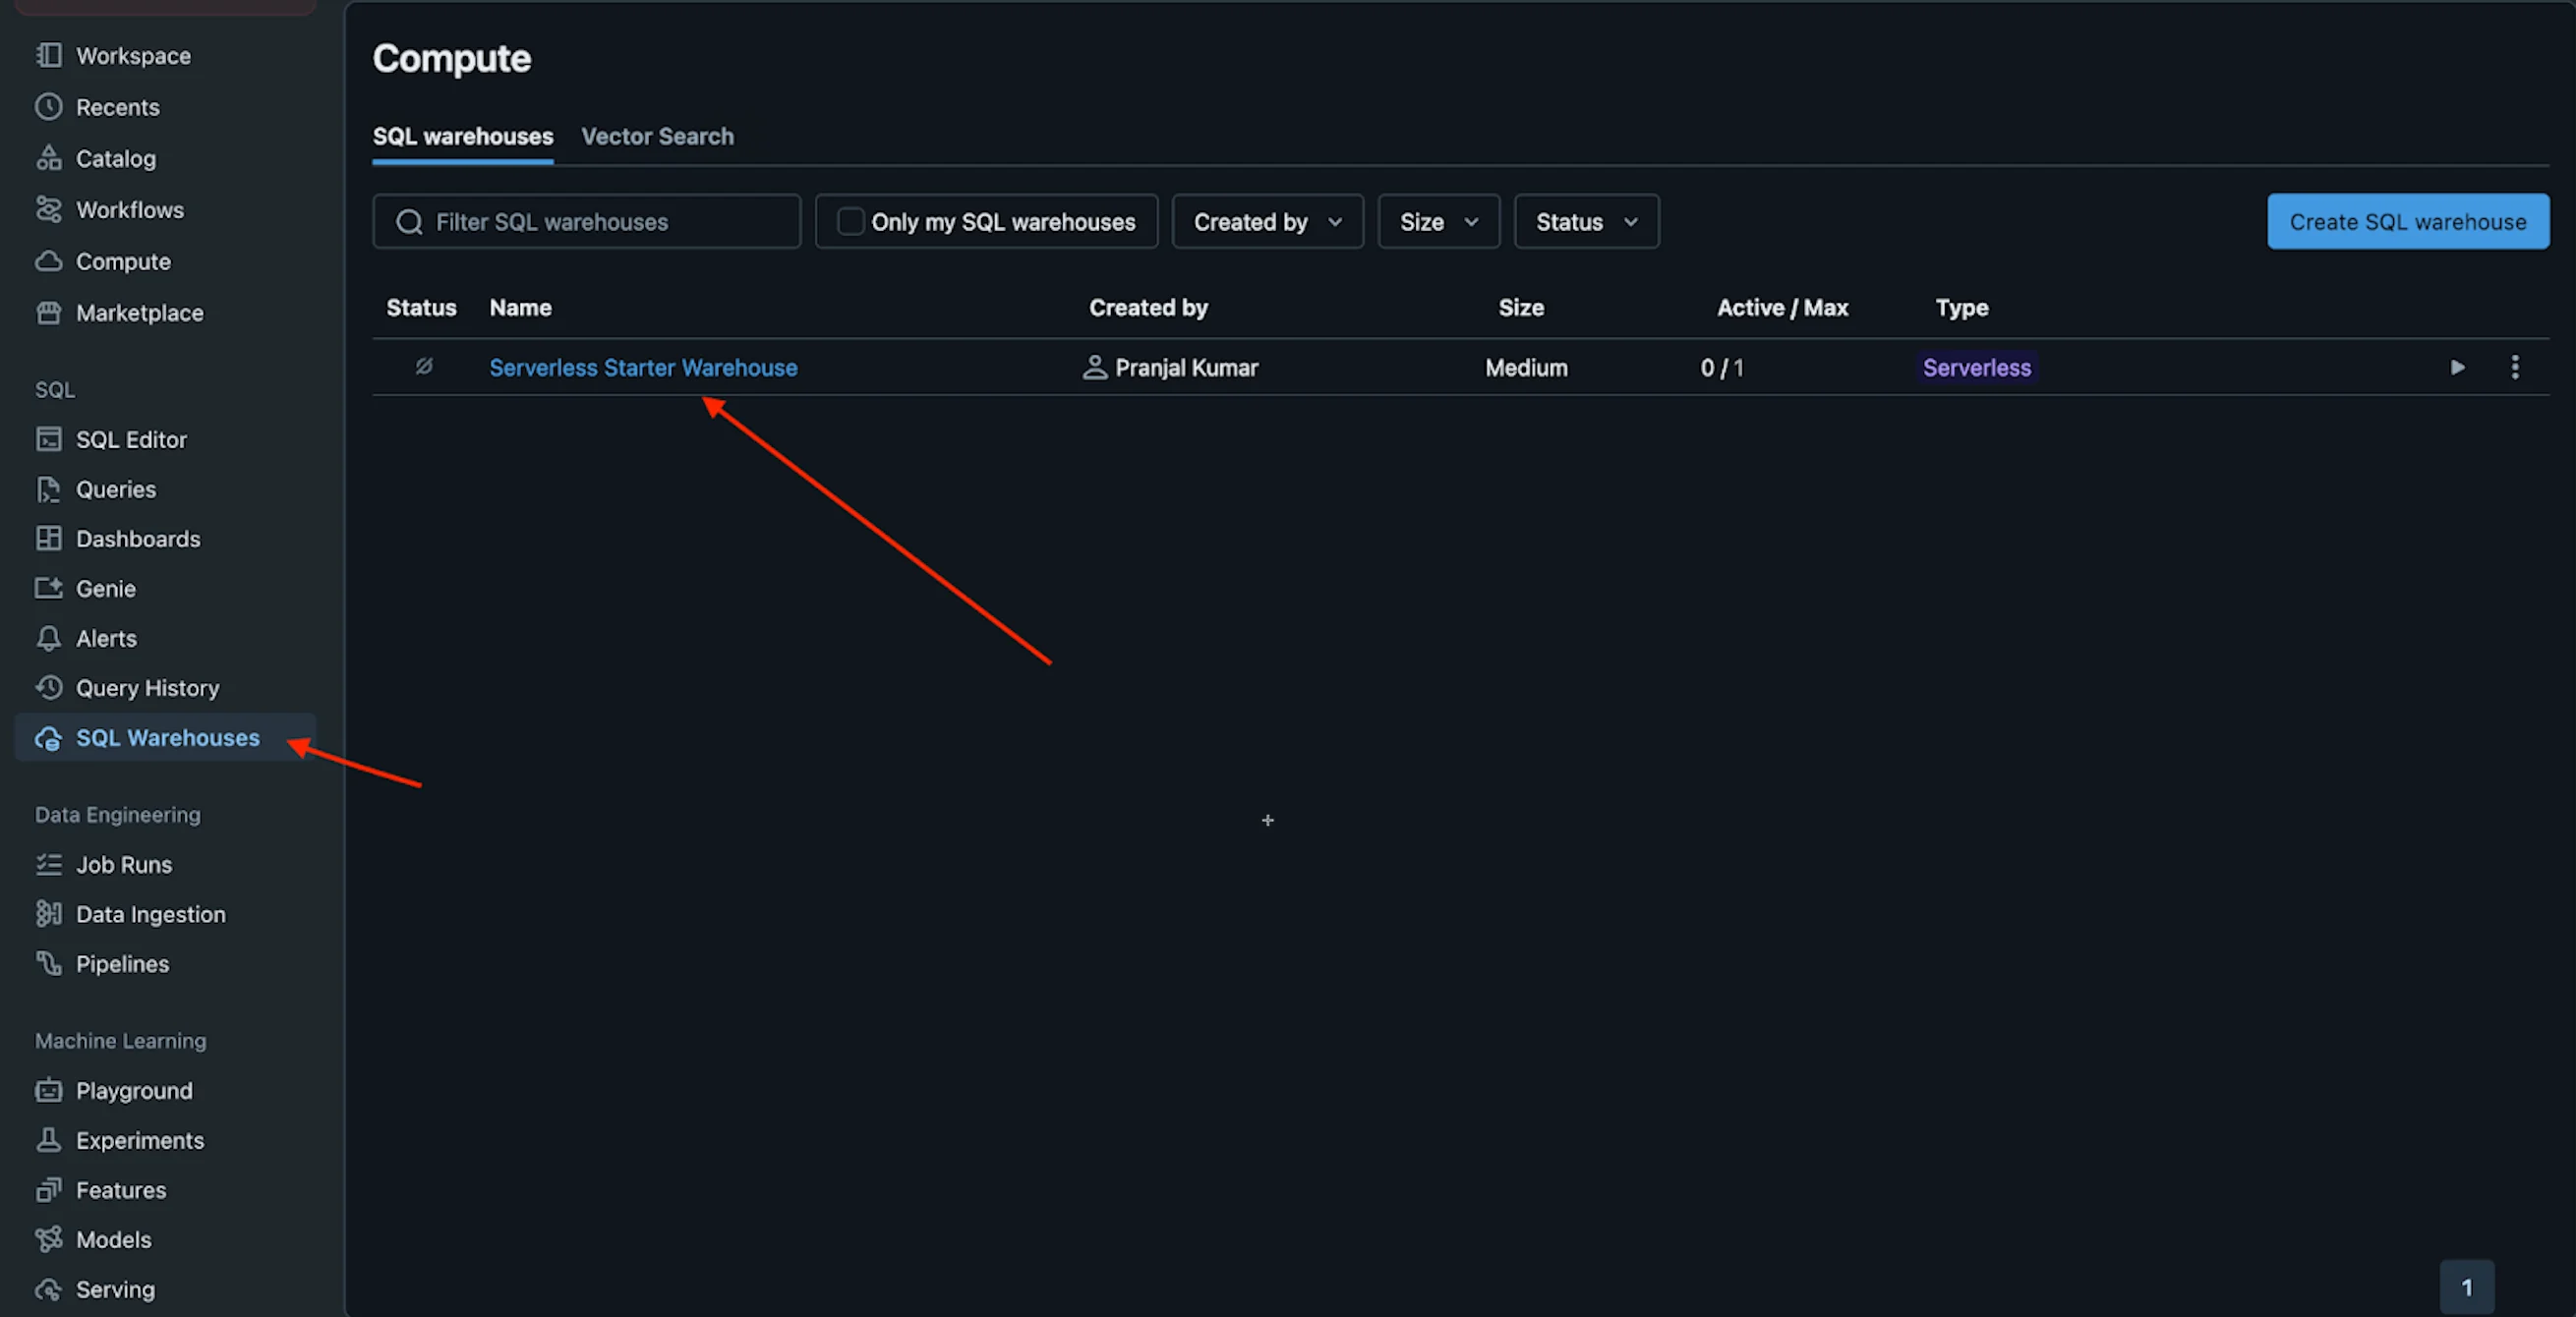 4. On the **Serverless Starter Warehouse** page, click the **Connection details** tab.
 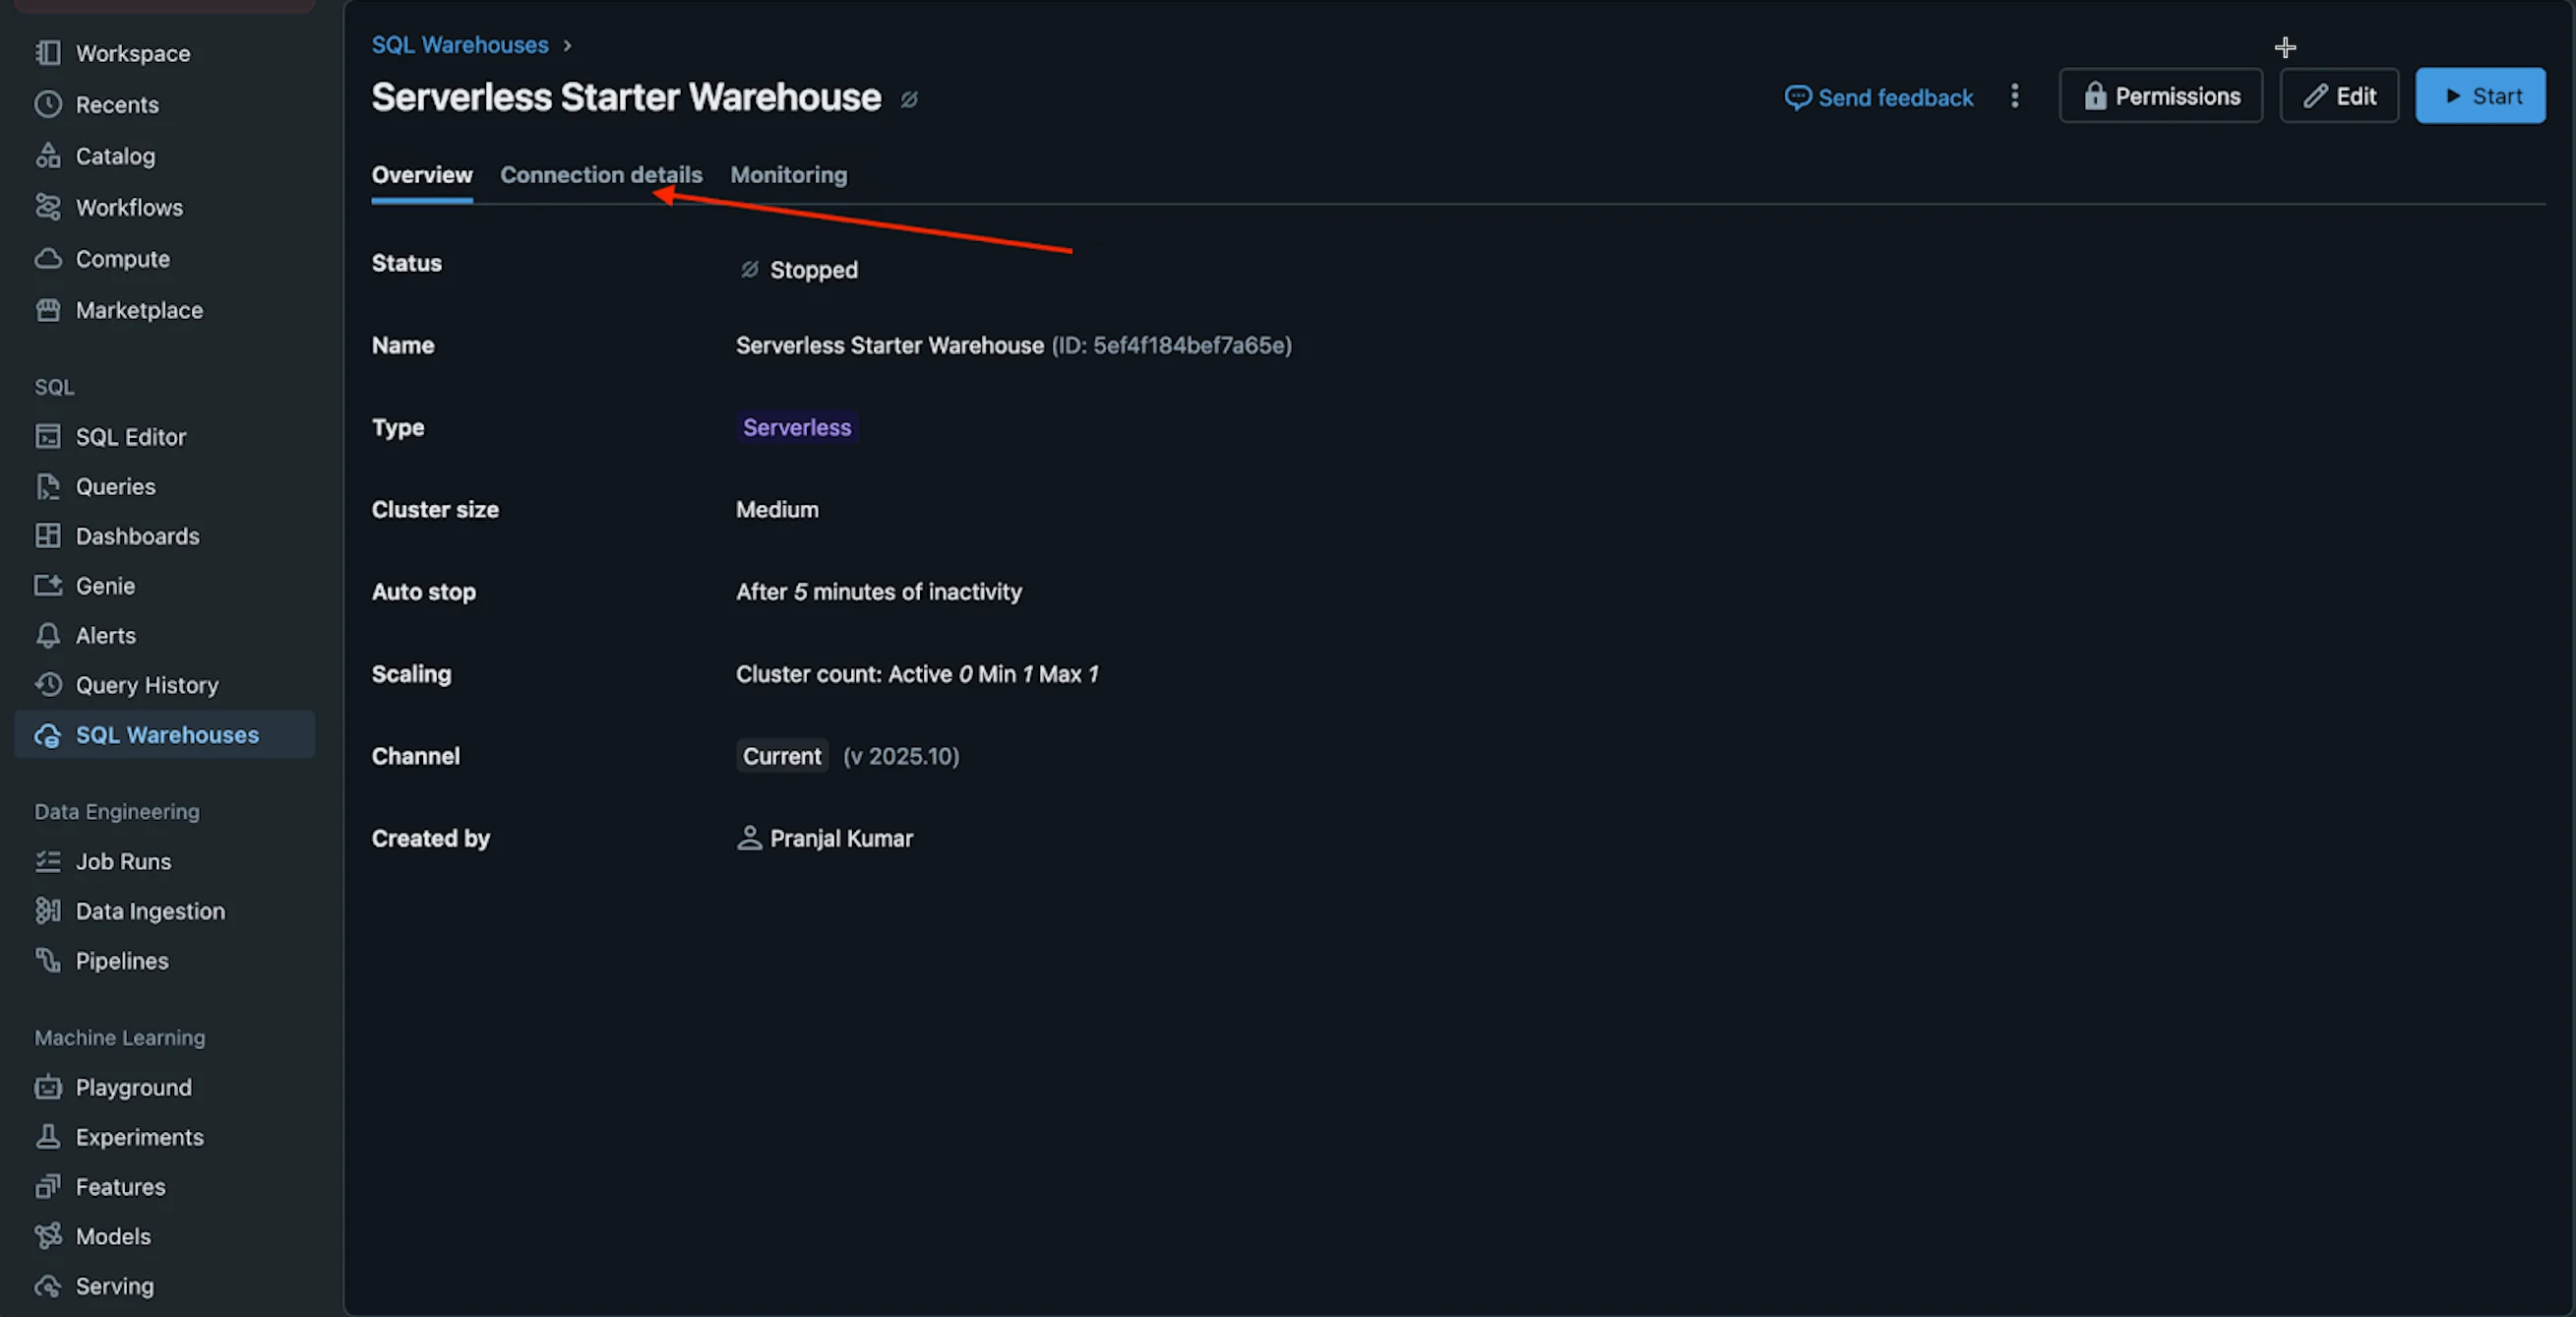 5. Copy the **Server hostname** and **HTTP path** credentials to paste into the MoEngage App marketplace.
  To create a generated access token, you can also follow the steps mentioned in the **Create a Personal Access Token (PAT)** section.
6. Click **Create a personal access token** at the upper-right corner.
To create a generated access token, you can also follow the steps mentioned in the **Create a Personal Access Token (PAT)** section.
6. Click **Create a personal access token** at the upper-right corner. 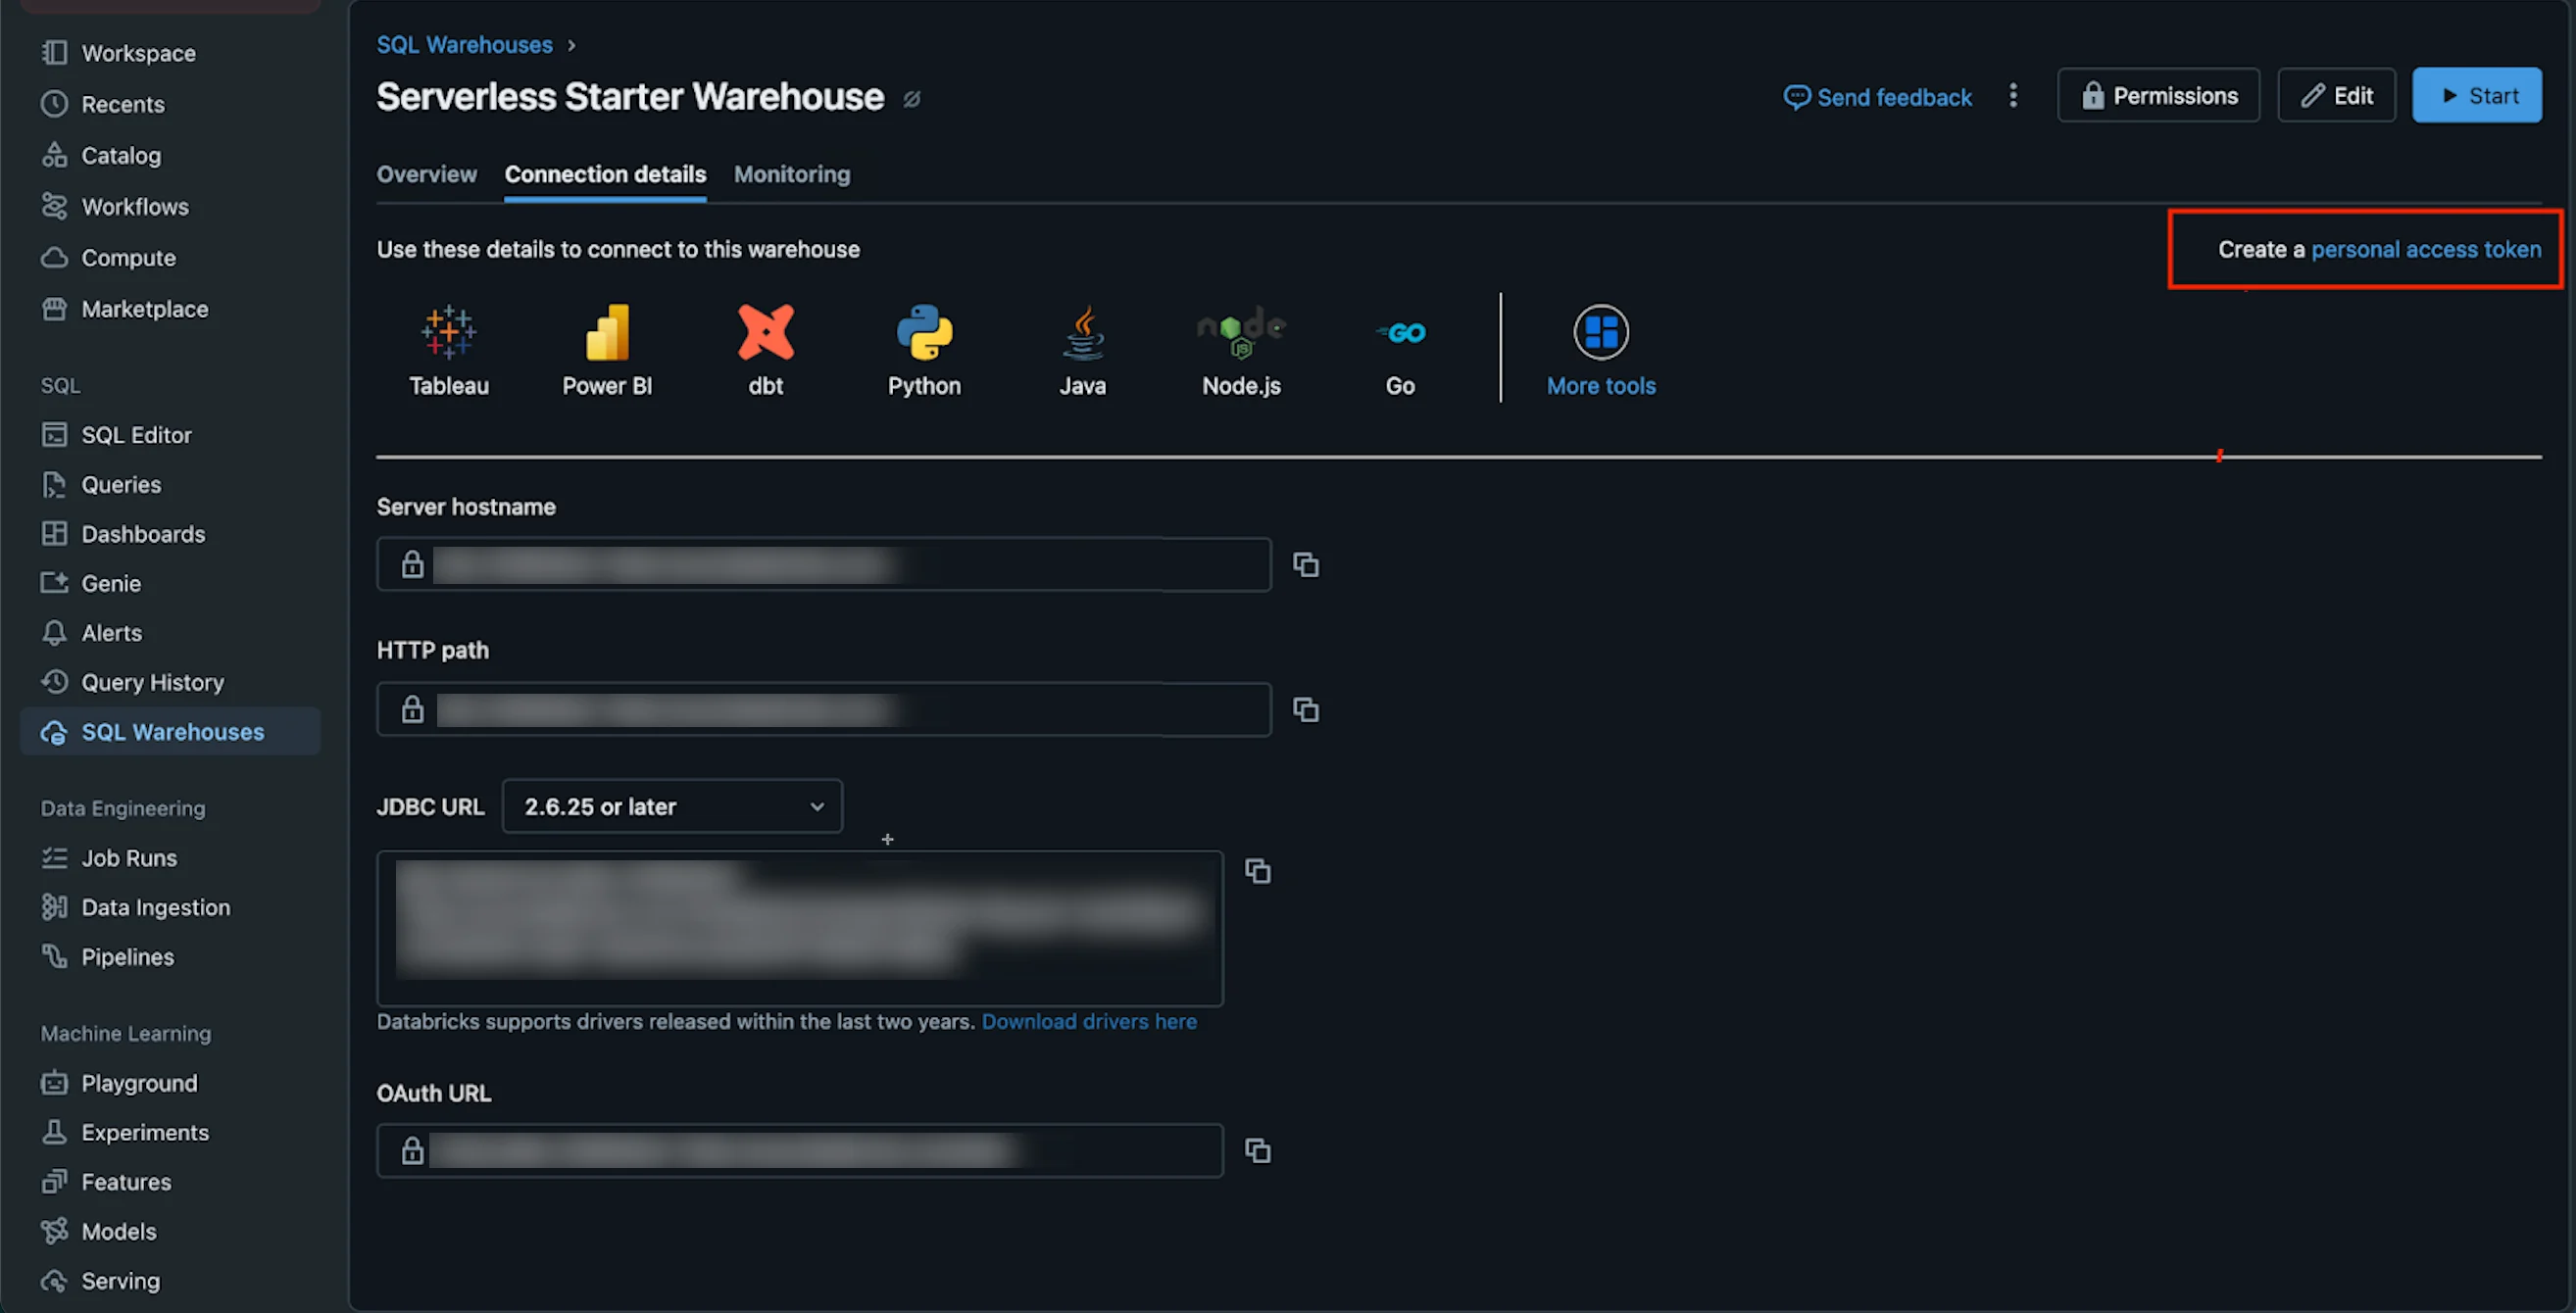 7. On the Access tokens page, click **Generate new token**.
 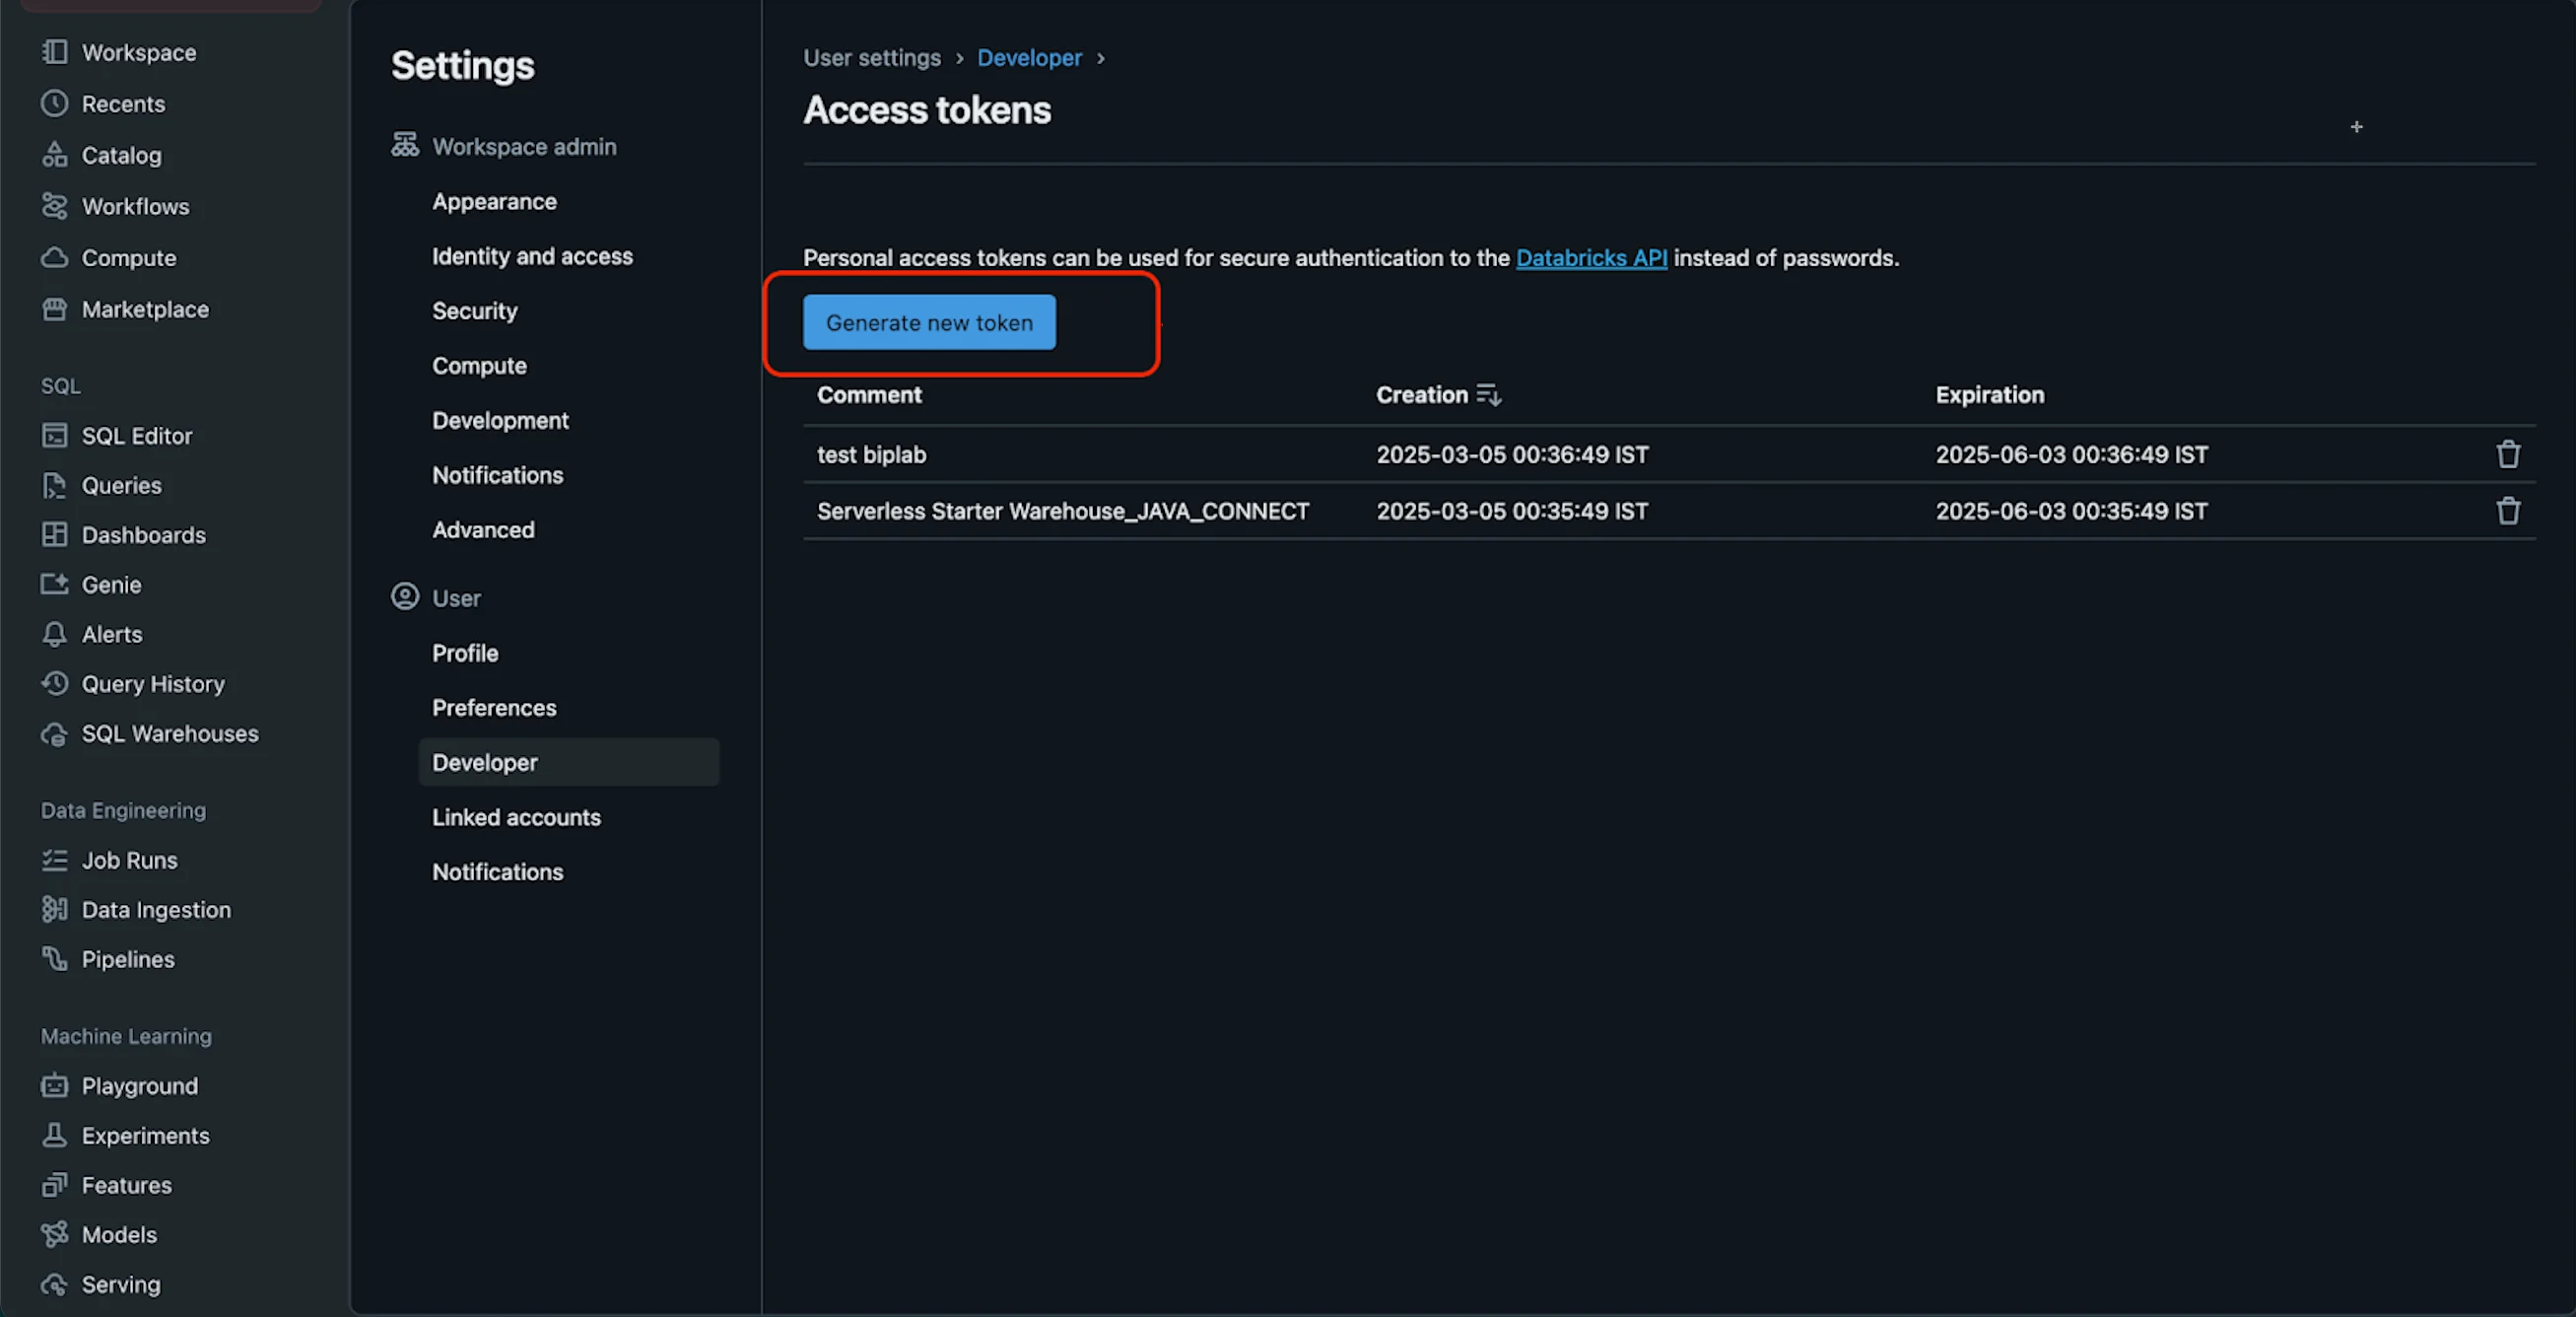 8. On the **Generate new token** pop-up window:
1. In the **Comment** box, type the token name.
2. In the **Lifetime** box, type the token's lifespan.
3. Click **Generate**.
8. On the **Generate new token** pop-up window:
1. In the **Comment** box, type the token name.
2. In the **Lifetime** box, type the token's lifespan.
3. Click **Generate**.  Your token is now generated successfully.
9. Copy the token to paste into the MoEngage App marketplace.
10. Click **Done**.
Your token is now generated successfully.
9. Copy the token to paste into the MoEngage App marketplace.
10. Click **Done**. 
 The generated token is available on the **Access tokens** page.
The generated token is only visible once.
## Step 3: Connect Databricks on the App Marketplace
To connect Databricks on the App marketplace, perform the following steps:
1. On the left navigation menu in the MoEngage dashboard, click **App marketplace**.
2. On the App Marketplace page, search for **Databricks**.
The generated token is available on the **Access tokens** page.
The generated token is only visible once.
## Step 3: Connect Databricks on the App Marketplace
To connect Databricks on the App marketplace, perform the following steps:
1. On the left navigation menu in the MoEngage dashboard, click **App marketplace**.
2. On the App Marketplace page, search for **Databricks**.
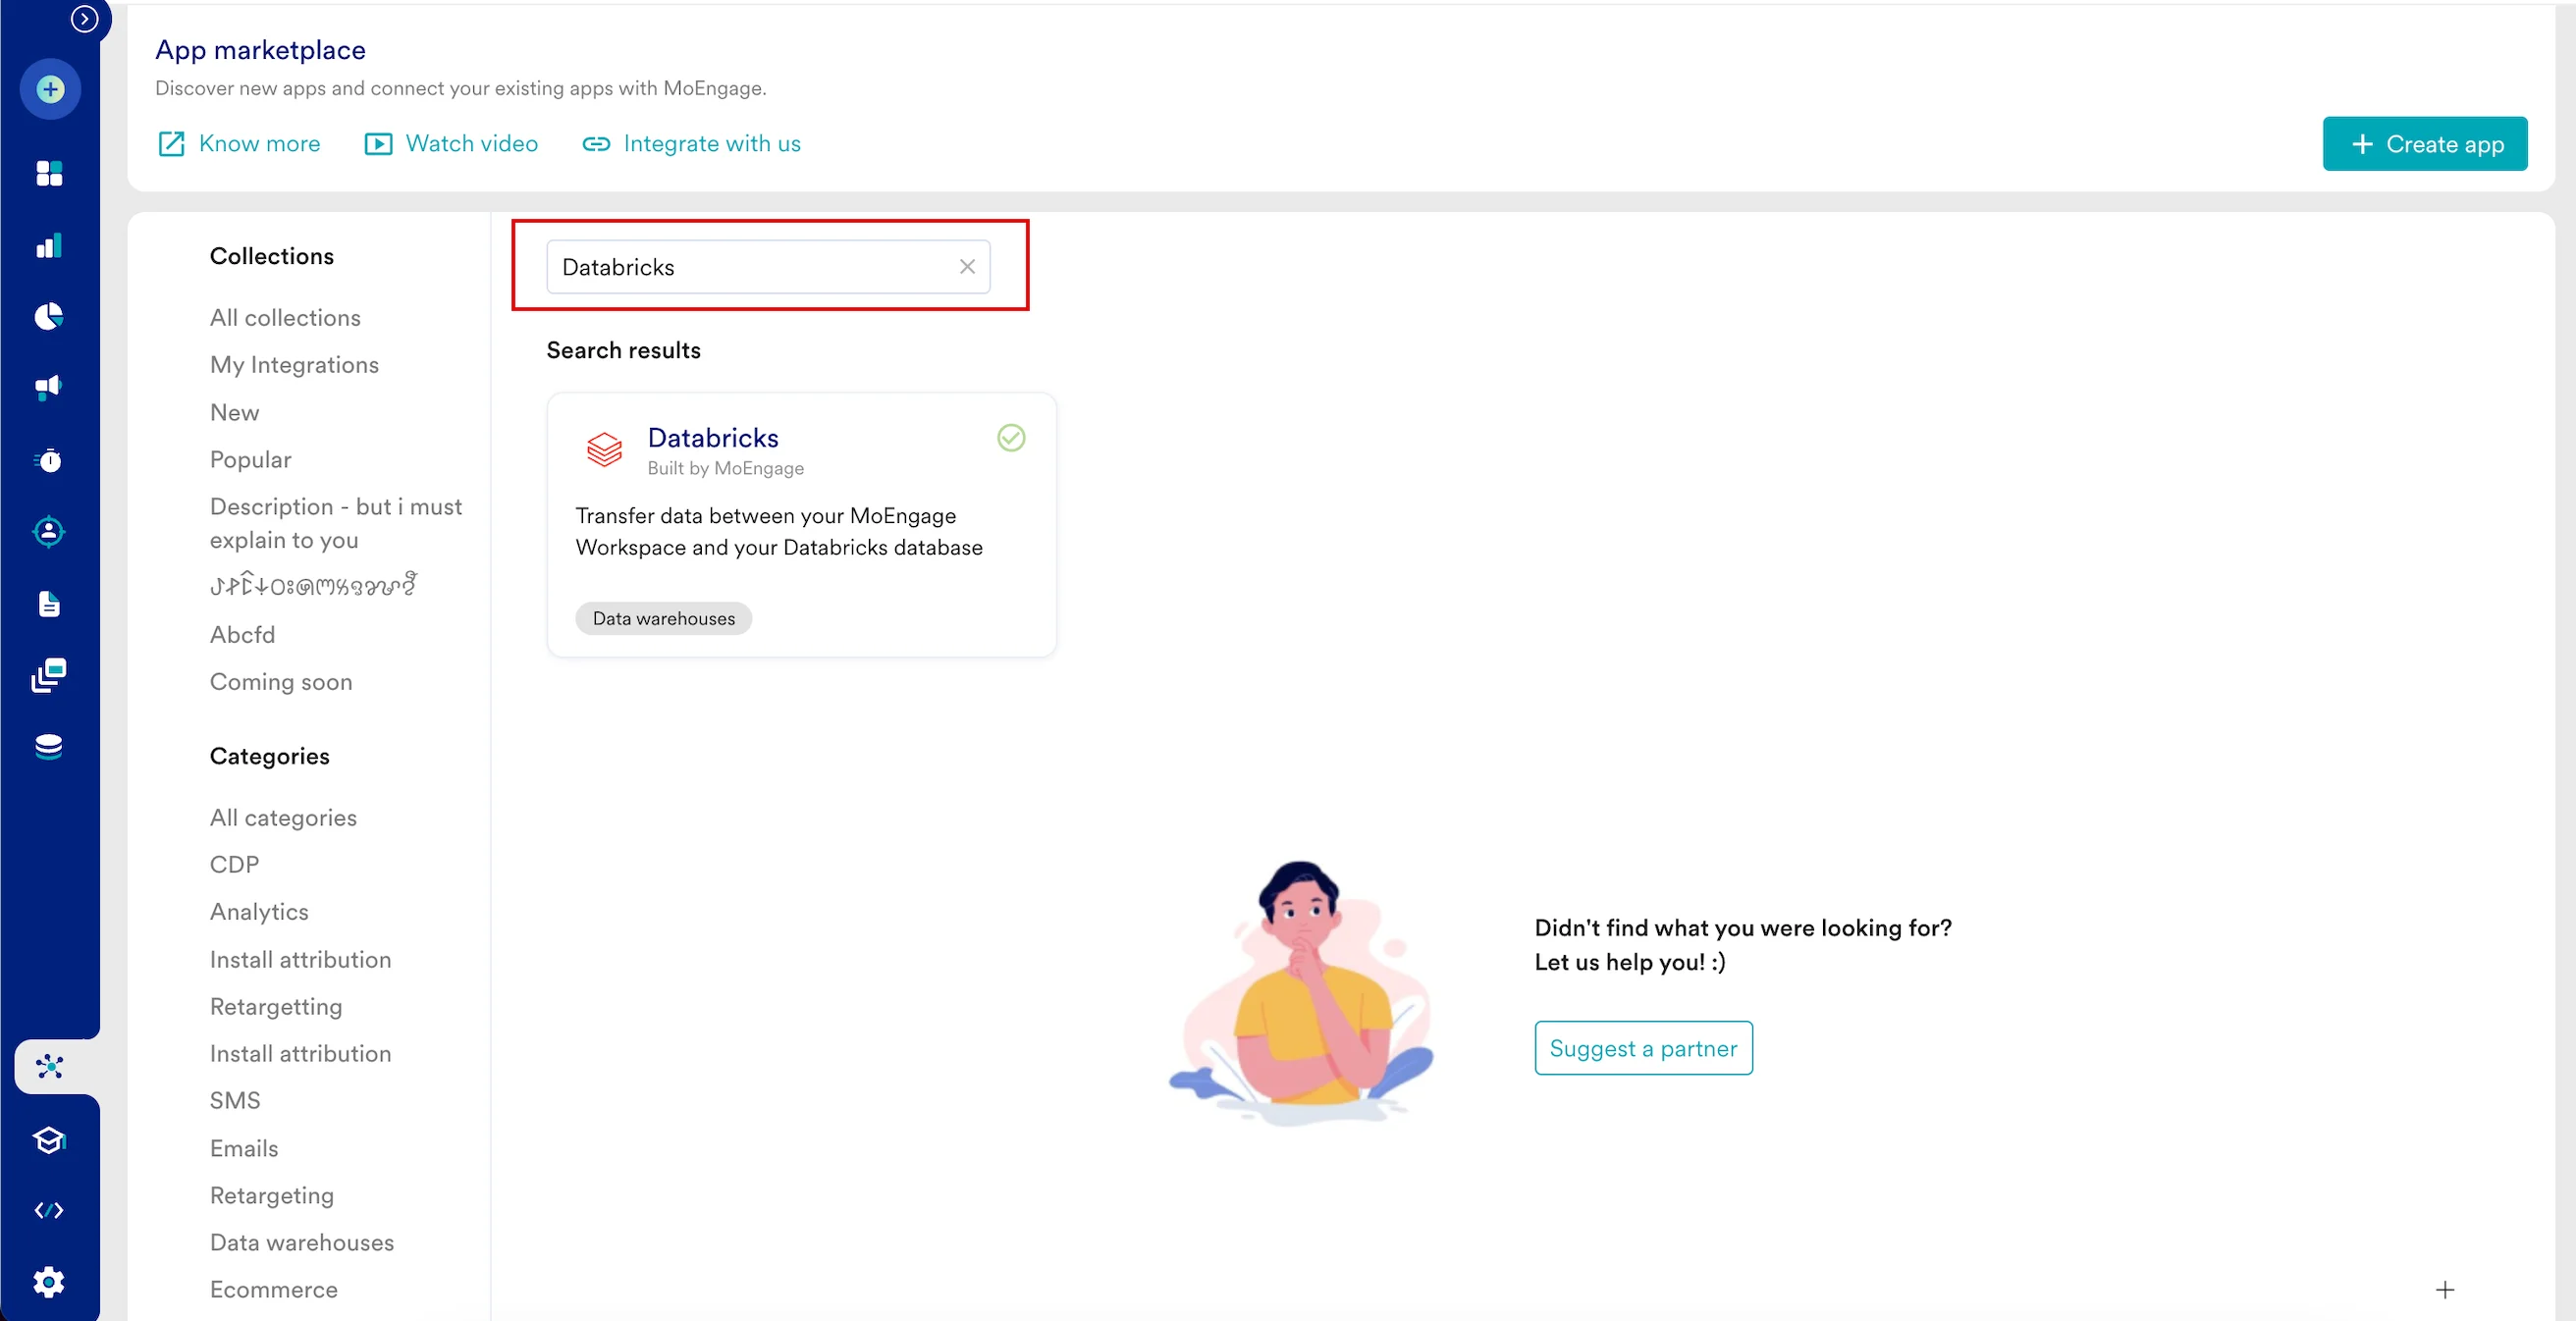 3. Click the **Databricks** tile.
4. On the Databricks page, go to the **Integrate** tab and click +**Add Connection**.
5. Enter the following details:
| Field | Required | Description |
| --------------- | -------- | ----------------------------------------------------------------------------------------------------------------------------------------------------------------------------------------------------------------------------------------------------------------------------------------------------------- |
| Connection name | Yes | Type a name for the Databricks connection. |
| Host name | Yes | This refers to the unique identifier assigned to a specific cluster. Type the hostname that you want to connect. To find your server hostname, visit the Databricks web console and locate your cluster. Then, click to reveal **Advanced options** and navigate to the **JDBC/ODBC** tab. |
| Port | Optional | Type the port to which you want to connect your Databricks server. It defaults to 443. |
| HTTP path | Yes | Type the HTTP path of your compute resource on Databricks. To find your HTTP path, go to your Databricks workspace, locate your warehouse, and then get your HTTP path from the connection details tab. |
| Access token | Yes | This is an authentication token used to access Databricks APIs securely. Type the Access token, which helps you make authorized requests to the Databricks server with the necessary permissions. On your Databricks workspace, go to **Settings** > **Developer** > **Access tokens** > **Manage tokens**. |
| Catalog | Yes | Type the Databricks Catalog name to which MoEngage will have access. |
3. Click the **Databricks** tile.
4. On the Databricks page, go to the **Integrate** tab and click +**Add Connection**.
5. Enter the following details:
| Field | Required | Description |
| --------------- | -------- | ----------------------------------------------------------------------------------------------------------------------------------------------------------------------------------------------------------------------------------------------------------------------------------------------------------- |
| Connection name | Yes | Type a name for the Databricks connection. |
| Host name | Yes | This refers to the unique identifier assigned to a specific cluster. Type the hostname that you want to connect. To find your server hostname, visit the Databricks web console and locate your cluster. Then, click to reveal **Advanced options** and navigate to the **JDBC/ODBC** tab. |
| Port | Optional | Type the port to which you want to connect your Databricks server. It defaults to 443. |
| HTTP path | Yes | Type the HTTP path of your compute resource on Databricks. To find your HTTP path, go to your Databricks workspace, locate your warehouse, and then get your HTTP path from the connection details tab. |
| Access token | Yes | This is an authentication token used to access Databricks APIs securely. Type the Access token, which helps you make authorized requests to the Databricks server with the necessary permissions. On your Databricks workspace, go to **Settings** > **Developer** > **Access tokens** > **Manage tokens**. |
| Catalog | Yes | Type the Databricks Catalog name to which MoEngage will have access. |
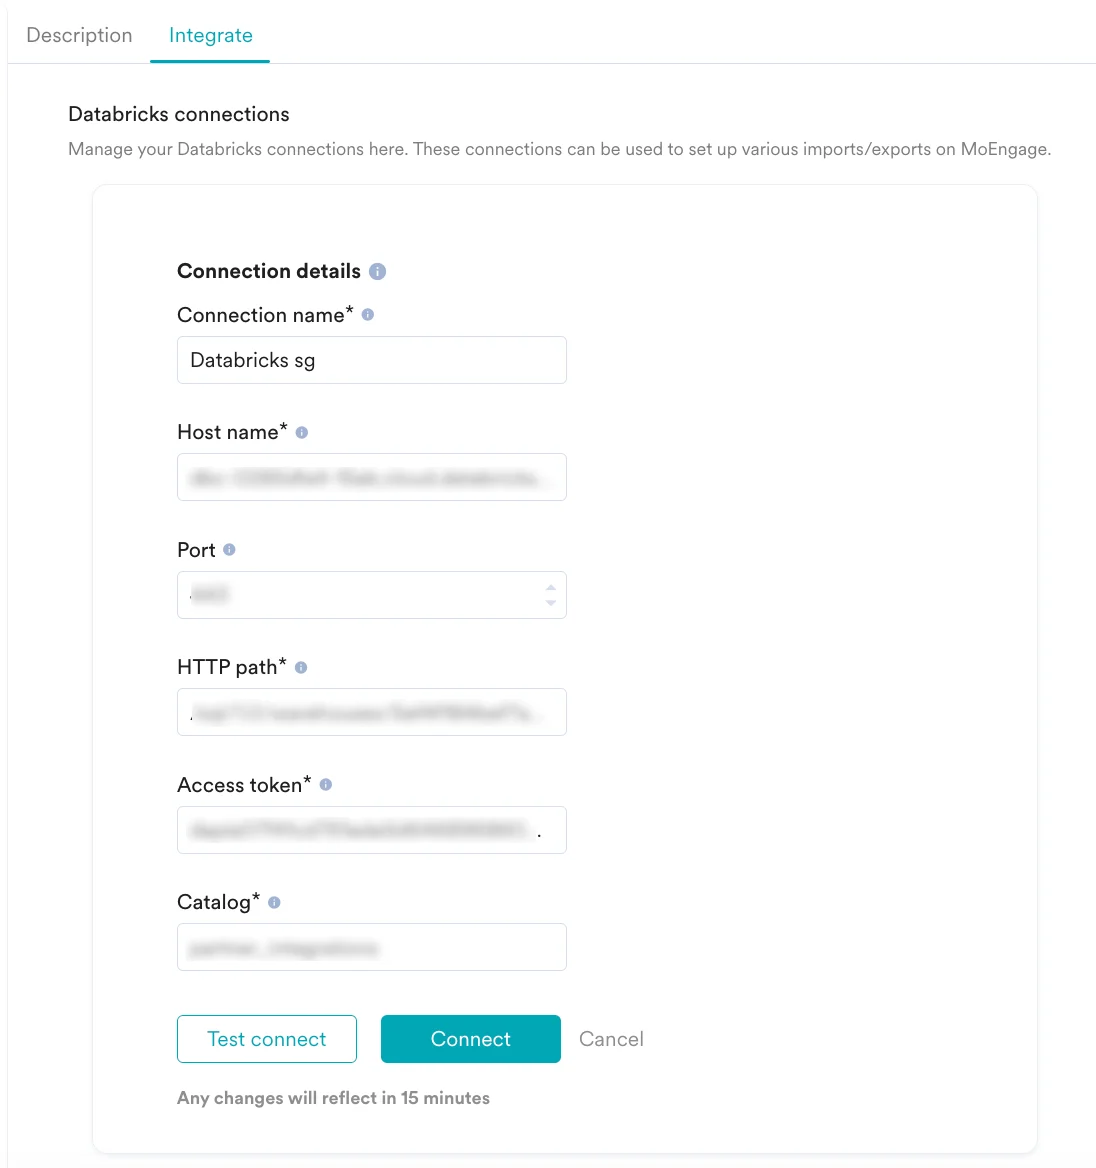 6. Click **Connect**. Your Databricks connection is now integrated.
After you have set up a Databricks connection, you can use it to set up various imports and exports in MoEngage.
### Supported Datetime Formats
| Date and Time Format | Examples |
| ----------------------------------------------- | ---------------------------------------------------------------------------------------------------------------------------- |
| `"datetime_format": "YYYY-MM-DD"` | |
| `"datetime_format": "YYYY/MM/DD"` | |
| `"datetime_format": "DD/MM/YYYY"` | |
| `"datetime_format": "DD-MM-YYYY"` | |
| `"datetime_format": "DD-MM-YYYY hh:mm:ss"` | |
| `"datetime_format": "DD/MM/YYYY hh:mm:ss"` | |
| `"datetime_format": "YYYY-MM-DD hh:mm:ss"` | |
| `"datetime_format": "YYYY/MM/DD hh:mm:ss"` | |
| `"datetime_format": "DD-MM-YYYYThh:mm:ss.s"` | |
| `"datetime_format": "DD/MM/YYYYThh:mm:ss.s"` | |
| `"datetime_format": "DD-MM-YYYYThh:mm:ssTZD"` |
6. Click **Connect**. Your Databricks connection is now integrated.
After you have set up a Databricks connection, you can use it to set up various imports and exports in MoEngage.
### Supported Datetime Formats
| Date and Time Format | Examples |
| ----------------------------------------------- | ---------------------------------------------------------------------------------------------------------------------------- |
| `"datetime_format": "YYYY-MM-DD"` | |
| `"datetime_format": "YYYY/MM/DD"` | |
| `"datetime_format": "DD/MM/YYYY"` | |
| `"datetime_format": "DD-MM-YYYY"` | |
| `"datetime_format": "DD-MM-YYYY hh:mm:ss"` | |
| `"datetime_format": "DD/MM/YYYY hh:mm:ss"` | |
| `"datetime_format": "YYYY-MM-DD hh:mm:ss"` | |
| `"datetime_format": "YYYY/MM/DD hh:mm:ss"` | |
| `"datetime_format": "DD-MM-YYYYThh:mm:ss.s"` | |
| `"datetime_format": "DD/MM/YYYYThh:mm:ss.s"` | |
| `"datetime_format": "DD-MM-YYYYThh:mm:ssTZD"` | - 31-12-2022T12:10:33Z
- 31-12-2022T12:10:33+08:00
- 31-12-2022T12:10:33-08:00
|
| `"datetime_format": "DD/MM/YYYYThh:mm:ssTZD"` | - 31/12/2022T12:10:33Z
- 31/12/2022T12:10:33+08:00
- 31/12/2022T12:10:33-08:00
|
| `"datetime_format": "YYYY-MM-DD hh:mm:ss.s"` | 2019-02-22 17:54:14.933 |
| `"datetime_format": "YYYY/MM/DD hh:mm:ss.s"` | 2019/02/22 17:54:14.933 |
| `"datetime_format": "YYYY-MM-DDThh:mm:ssTZD"` | - 2019-11-14T00:01:02Z
- 2019-11-14T00:01:02+08:00
- 2019-11-14T00:01:02Z-08:00
|
| `"datetime_format": "YYYY/MM/DDThh:mm:ssTZD"` | - 2019/11/14T00:01:02Z
- 2019/11/14T00:01:02+08:00
- 2019/11/14T00:01:02-08:00
|
| `"datetime_format": "YYYY-MM-DDThh:mm:ss.sTZD"` | - 2019-02-22T17:54:14.957Z
- 2019-02-22T17:54:14.957299-08:00
- 2019-02-22T17:54:14.957299+08:00
|
| `"datetime_format": "YYYY/MM/DDThh:mm:ss.sTZD"` | - 2019/02/22T17:54:14.957Z
- 2019/02/22T17:54:14.957299-08:00
- 2019/02/22T17:54:14.957299+08:00
|
## Warehouse Segments Using Databricks
Databricks is available in our Warehouse Segments. For more information, refer to [Warehouse Segments](https://www.moengage.com/docs/user-guide/segment/segment-operations/warehouse-segments).
## Import Users and Events from Databricks into MoEngage
To set up MoEngage × Databricks imports for your account, refer to the [Databricks Imports guide](https://www.moengage.com/docs/user-guide/data/imports/data-warehouses-imports/databricks-imports).
## Export Events from MoEngage to Databricks
You can export events from MoEngage to your Databricks tables. To set up an export, refer to the [Databricks Exports guide](https://www.moengage.com/docs/user-guide/data/exports/events/data-warehouse/databricks-exports).