MoEngage × Zoho CRM
The integration of MoEngage and Zoho CRM empowers businesses to enhance their marketing and sales initiatives through seamless data synchronization. With this integration, you can:- Synchronize leads, deals, and more from Zoho CRM to MoEngage.
- Import sales activities like calls and meetings as behavioral events.
- Capture custom modules for comprehensive customer profiling.
Use Cases
Integrating Zoho CRM with MoEngage helps you solve the following use case:- Nurture qualified leads : Send personalized MoEngage campaigns based on lead scoring and stage progression in Zoho CRM.
- Re-engage lost opportunities : Send targeted win-back campaigns when deals are marked as Lost or Closed Lost to re-engage prospects.
Sync Modules
The following table outlines the default sync type for each module:Note Account Information: The Accounts module is also supported. To ensure your data is always current, associated account information is synced with your Contacts and Deals records, respectively.
Integration
Integration
Prerequisites: Ensure you have a Zoho CRM account with the necessary permissions to configure workflows and webhooks.
Step 1: Get Your MoEngage Endpoint
Step 1: Get Your MoEngage Endpoint
To get a dedicated endpoint for your integration, please contact the MoEngage Support team. In your request, you must specify the common identifier used to link user profiles between MoEngage and the partner platform.Step 2: Create a Workflow Rule in Zoho CRM
To set up a workflow rule, perform the following steps:- On the Zoho CRM dashboard, navigate to Settings > Automation > Workflow Rules.
- On the Workflow Rules page, click Create Rule.

The Create New Rule dialog box appears. Now, select the module you want to sync. Note: Zoho workflows are module-specific; you must create a separate workflow for each module. - In the Module list, select the desired module, such as Contacts, Leads, Deals, Calls, Meetings, and so on.
- In the Rule Name box, type a name for the rule.
- In the Description box (Optional), type a description of the rule’s purpose.
- Click Next.
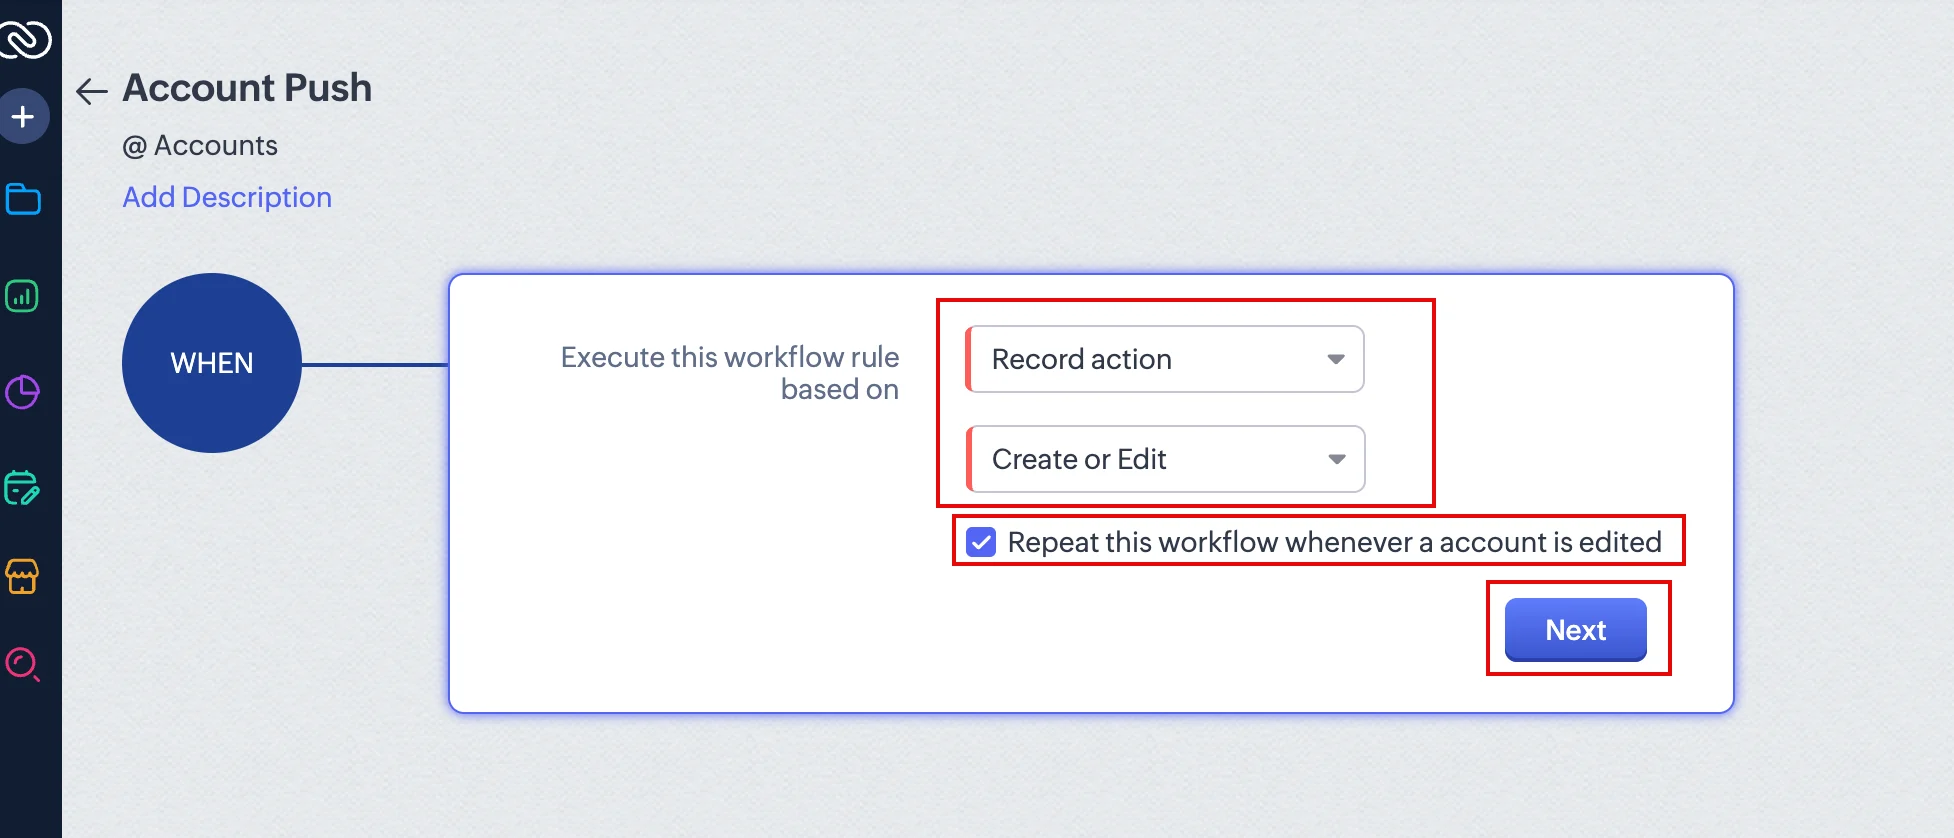
 Now, configure the trigger.
 - In the WHEN block, click the drop-down list next to Execute this workflow rule based on and select Record action. This selection populates a dependent drop-down list.
- In the dependent drop-down list, select an action type, such as Create or Edit.
- Select the Repeat this workflow whenever a contact is edited check box (optional) if you want the workflow to repeat every time a record is edited.
- Click Next.
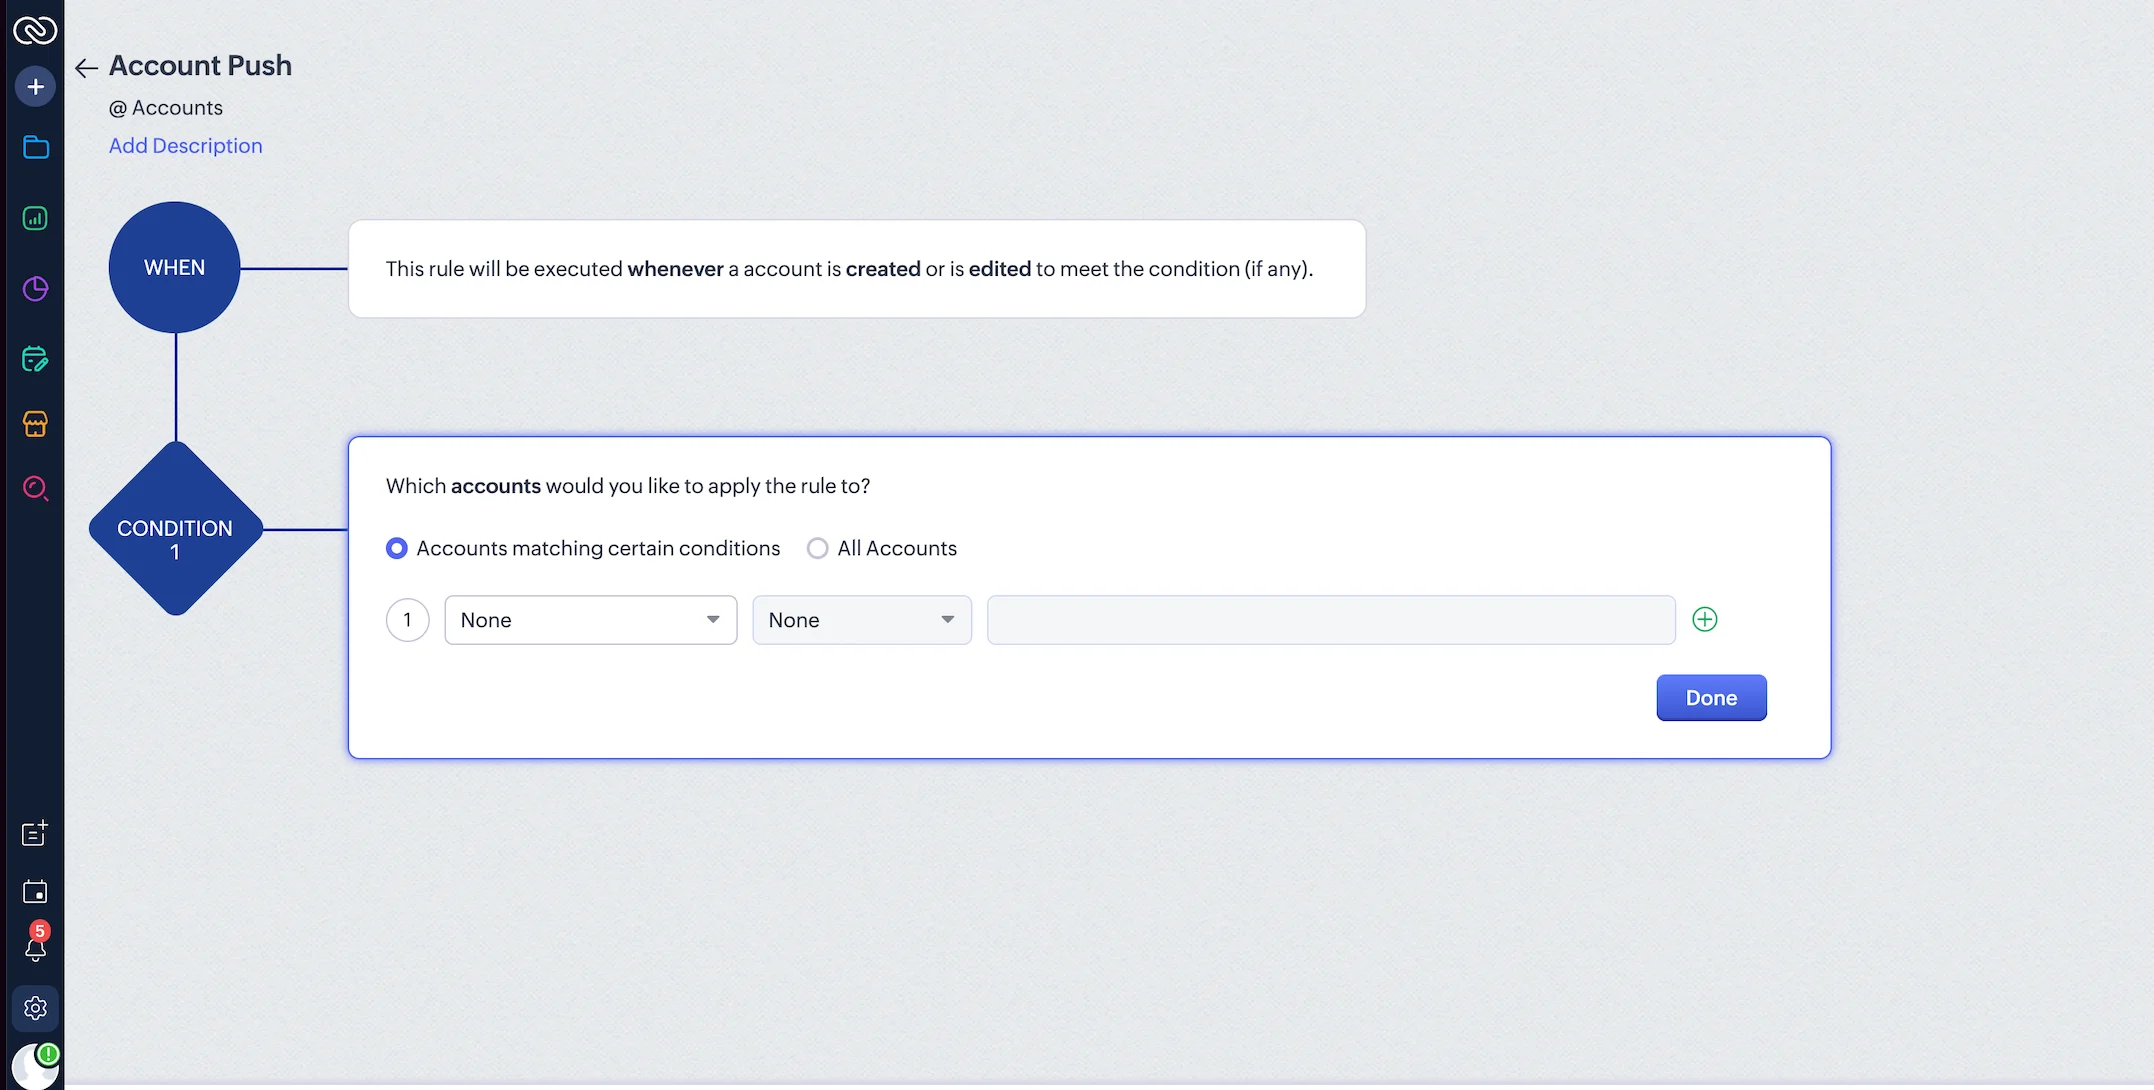
- In the CONDITION block, you can define the following workflow rule to execute for all records or add specific filter conditions if needed.
Step 2: Create a Workflow Rule in Zoho CRM
To set up a workflow rule, perform the following steps:- On the Zoho CRM dashboard, navigate to Settings > Automation > Workflow Rules.
- On the Workflow Rules page, click Create Rule.
The Create New Rule dialog box appears. Now, select the module you want to sync. Note: Zoho workflows are module-specific; you must create a separate workflow for each module. - In the Module list, select the desired module, such as Contacts, Leads, Deals, Calls, Meetings, and so on.
- In the Rule Name box, type a name for the rule.
- In the Description box (Optional), type a description of the rule’s purpose.
- Click Next. Now, configure the trigger.
- In the WHEN block, click the drop-down list next to Execute this workflow rule based on and select Record action. This selection populates a dependent drop-down list.
- In the dependent drop-down list, select an action type, such as Create or Edit.
- Select the Repeat this workflow whenever a contact is edited check box (optional) if you want the workflow to repeat every time a record is edited.
- Click Next.
- In the CONDITION block, you can define the following workflow rule to execute for all records or add specific filter conditions if needed.
Step 3: Configure a Webhook Action
To configure a Webhook action, perform the following steps:- In the Instant Actions list, select Webhook.
The Webhook dialog box appears. - Click Configure Webhook.

- In the Webhooks page, provide the following details:
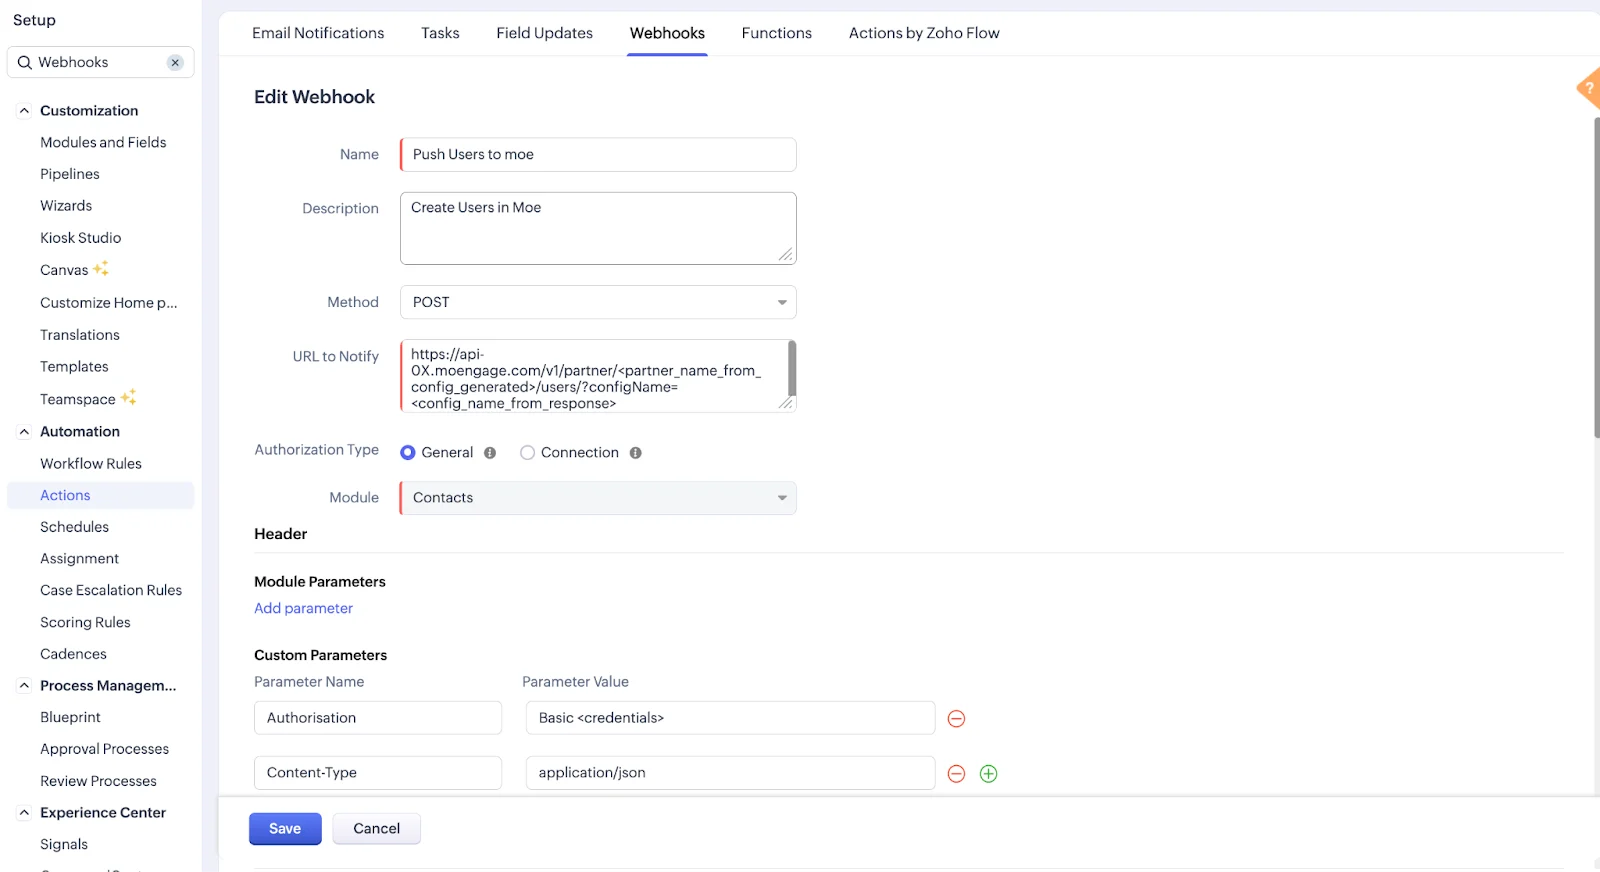
Step 4: Configure the Webhook Request Body
In the Request Body section, you can select one of the following options:- Simple configuration : Use pre-built JSON payloads with MoEngage’s default field mappings.
- Advanced configuration : Use a boilerplate template to build your custom payload. To populate the key-value pairs with your specific data, use Zoho CRM merge fields.
Boilerplate Templates
For User Data (Contacts/Leads)
For User Data (Contacts/Leads)
For Event Data (Deals/Activities)
For Event Data (Deals/Activities)
Data Mapping Guidelines
- Unique Identifier ( Customer ID) : Use a consistent, immutable unique identifier (like an external_id, email address, or phone number) from your Zoho CRM data. Map this value to the
customer_idfield in your MoEngage payload. This is critical for data merging and preventing duplicate user profiles. - Required Fields : All payloads must include the
customer_id,modified_time, andtypefields. These are essential for proper data processing, lookups, and segmentation. - Type : Specify the record type as “Contacts,” “Leads,” or “Deals” for accurate segmentation and targeting in MoEngage.
- Date and Time Formatting : Ensure all date and time fields, especially
modified_time, are formatted asdd-mm-yyyyHH:MM:SS. This setting is configured in the Zoho webhook. - Event Name : Include the
event_namein every event to identify and categorize actions in MoEngage. This ensures all events are tracked accurately for analysis and segmentation.
Mapping References
The following are the JSON mappings for modules like Contact, Lead, and Deal. You can use these examples or customize them by adding key-value pairs within the user_attributes or event_attributes objects.Contact Mapping (Users)
Contact Mapping (Users)
Lead Mapping (Users)
Lead Mapping (Users)
Deal Mapping (Events)
Deal Mapping (Events)
Custom Object Mapping: Meetings
Custom Object Mapping: Meetings
Custom Object Mapping: Calls
Custom Object Mapping: Calls
Custom Object Mapping Template
Custom Object Mapping Template
Field References
The following fields provides you to to see which fields are supported for each module and their corresponding Zoho CRM merge fields.Step 3: Configure a Webhook Action
To configure a Webhook action, perform the following steps:- In the Instant Actions list, select Webhook.
The Webhook dialog box appears. - Click Configure Webhook.
- In the Webhooks page, provide the following details:
Step 4: Configure the Webhook Request Body
For User Data (Contacts/Leads)
For User Data (Contacts/Leads)
For Event Data (Deals/Activities)
For Event Data (Deals/Activities)
Contact Mapping (Users)
Contact Mapping (Users)
Lead Mapping (Users)
Lead Mapping (Users)
Deal Mapping (Events)
Deal Mapping (Events)
Custom Object Mapping: Meetings
Custom Object Mapping: Meetings
Custom Object Mapping: Calls
Custom Object Mapping: Calls
Custom Object Mapping Template
Custom Object Mapping Template